Jeebly
Shopify Plugin Integration Guide • v2.0

Shopify Plugin
Integration Guide

Joy in motion

Abstract This document details the complete setup and operational workflow for the Jeebly eCommerce Shipping plugin on Shopify. It covers step-by-step installation, authentication, address management, shipment configuration, manual booking, order tracking, and all operational rules. This guide has been updated to reflect the current plugin UI and the numbered step-by-step walkthrough demonstrated in the official integration.
Install from Shopify App Store
Version: v2.0 Official App Store Listing Auto-Sync & Manual Booking

Shopify

Official Jeebly eCommerce Shipping App

Setup Time:< 10 mins
Compatibility:All Shopify Stores
Integration Type:Official Shopify App
Quick Start Installation
1

Overview

The Jeebly eCommerce Shipping plugin for Shopify enables merchants to seamlessly push orders from their Shopify store to the Jeebly logistics platform. It supports both automatic order syncing and manual shipment booking, real-time order tracking, AWB label printing, and wallet management — all within the Shopify admin interface.

Automatic Sync Auto-pushes eligible Shopify orders immediately.
Manual Booking Granular shipment booking with full control.
AWB Labels One-click PDF shipping label generation & printing.
Wallet Balance Live balance lookup & instant top-up redirect.

Plugin URL

Install the plugin directly from the official Shopify App Store:

https://apps.shopify.com/jeebly-ecommerce-shipping Open App Store
2

Installation — Step-by-Step

Follow the numbered steps below to install and configure the Jeebly plugin in your Shopify store. Each step corresponds to the walkthrough shown in the integration.

Initial Action: Log in to your Shopify Admin panel and navigate to your store.
Step 1 • Store Settings
Step 1

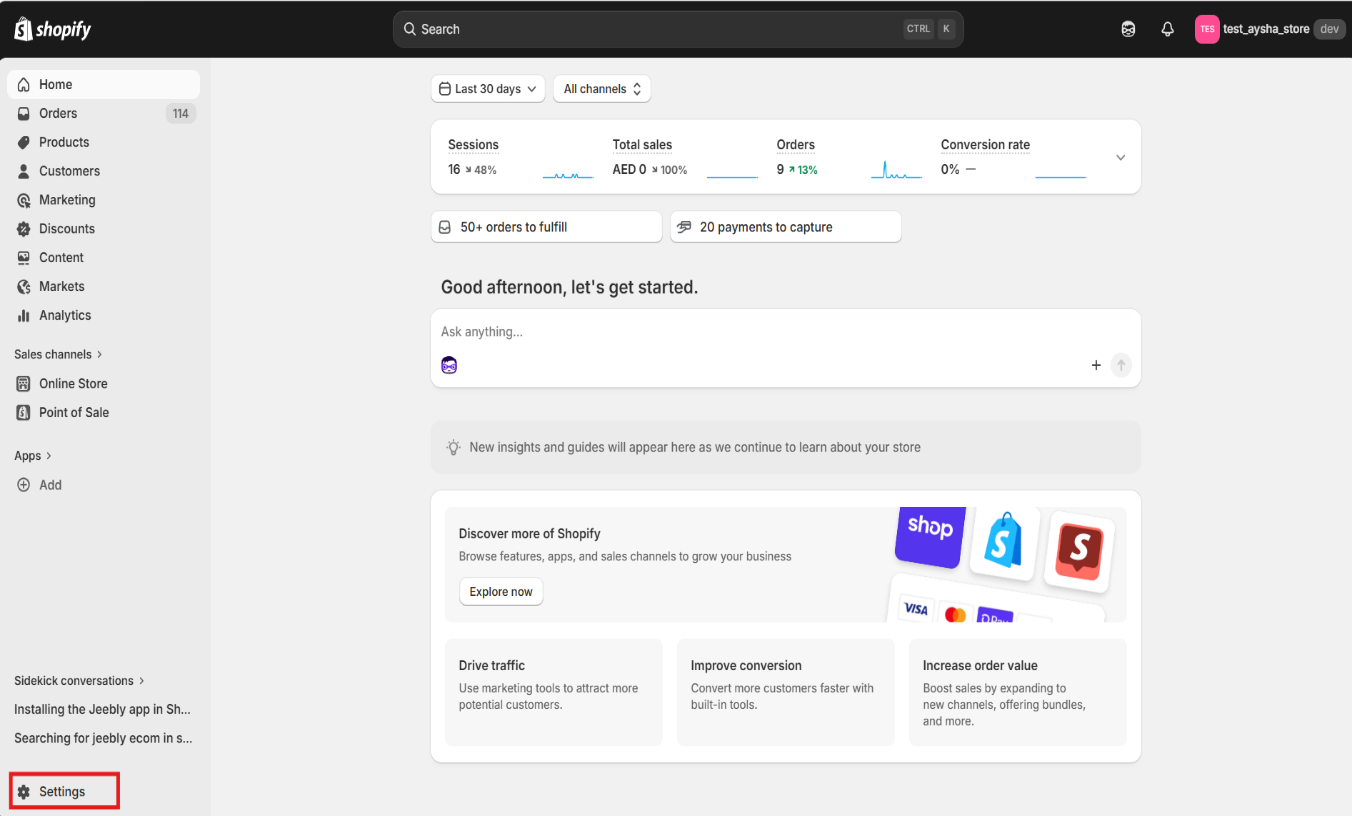
Navigate to Settings

Go to Settings in the bottom-left of your Shopify Admin sidebar.

Shopify Admin Settings
Locate Settings in bottom-left navigation.
Step 2 • Apps Section
Step 2

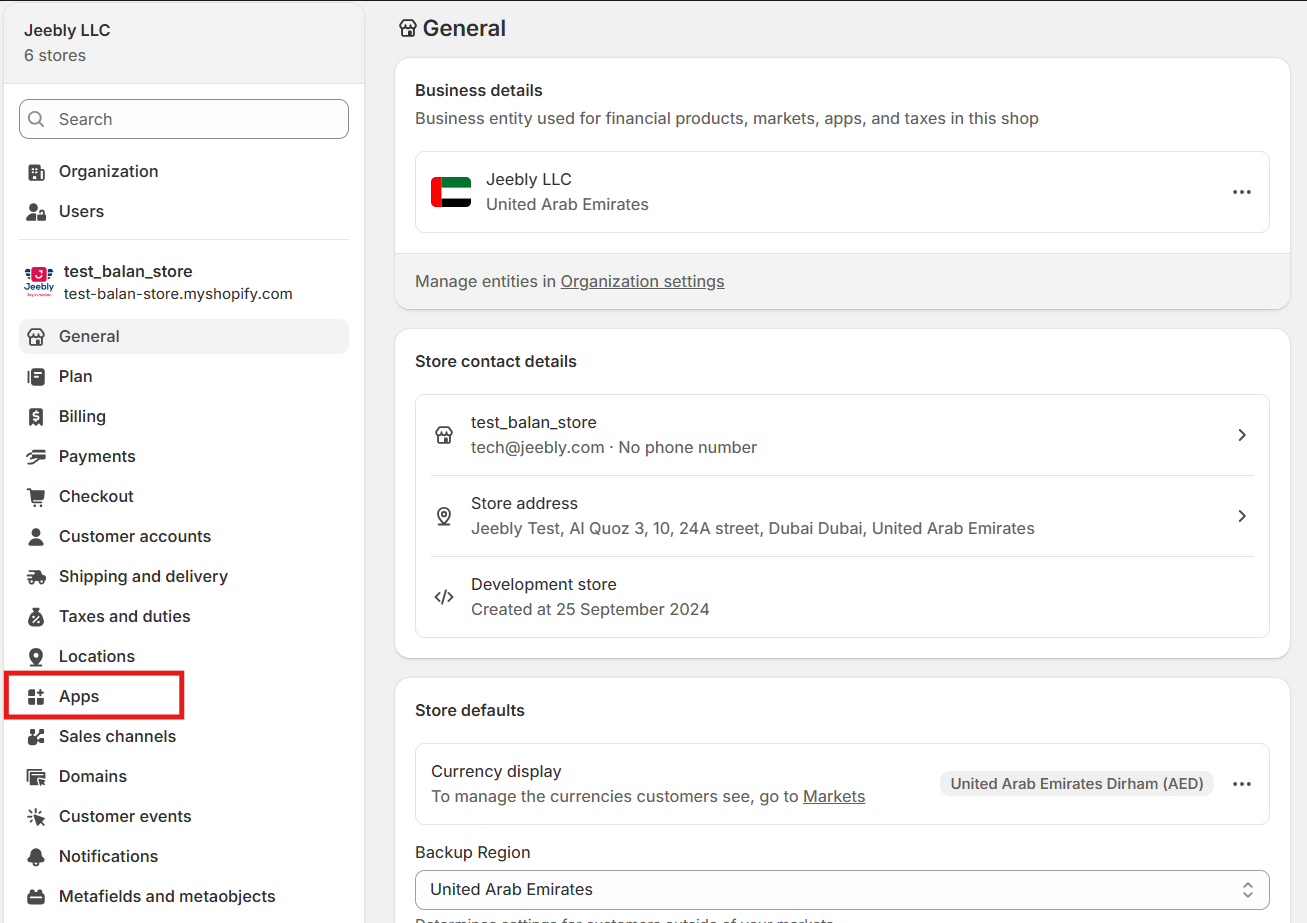
Access Apps Section

Navigate to Settings menu, locate the Apps section, and click on it.

Locate Apps section
Access Apps & Sales Channels in settings.
Step 3 • App Store
Step 3

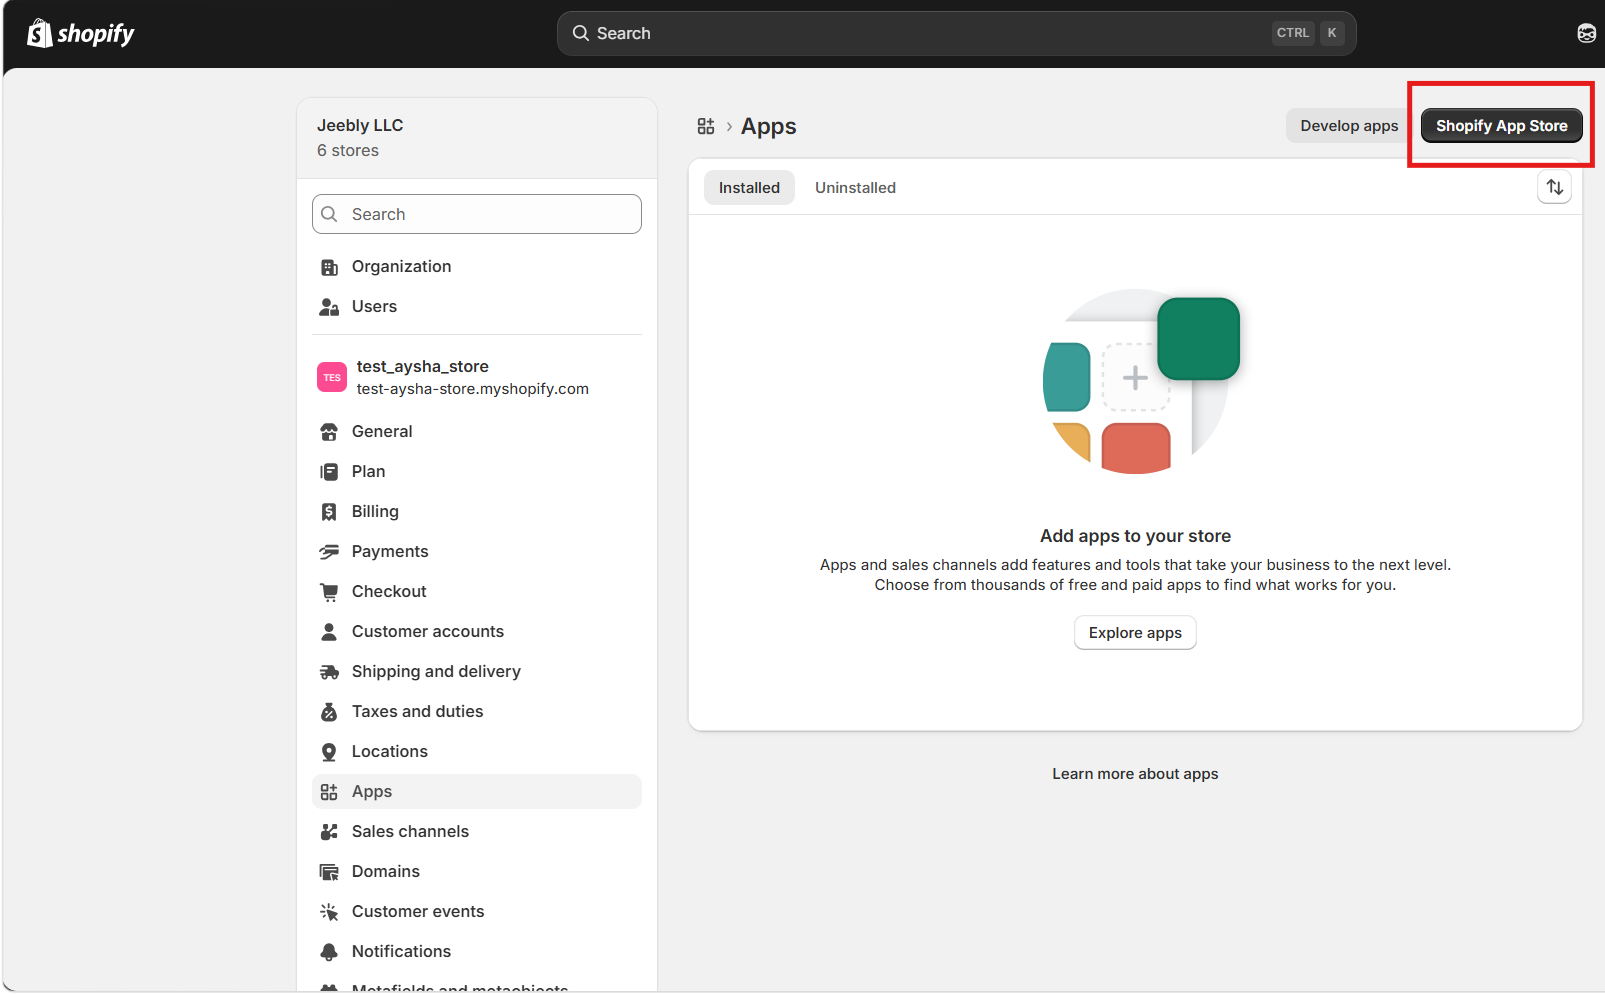
Open Shopify App Store

After clicking on Apps, click on the Shopify App Store option.

Shopify App Store option
Open the Shopify App Store directory.
Step 4 • Search App
Step 4

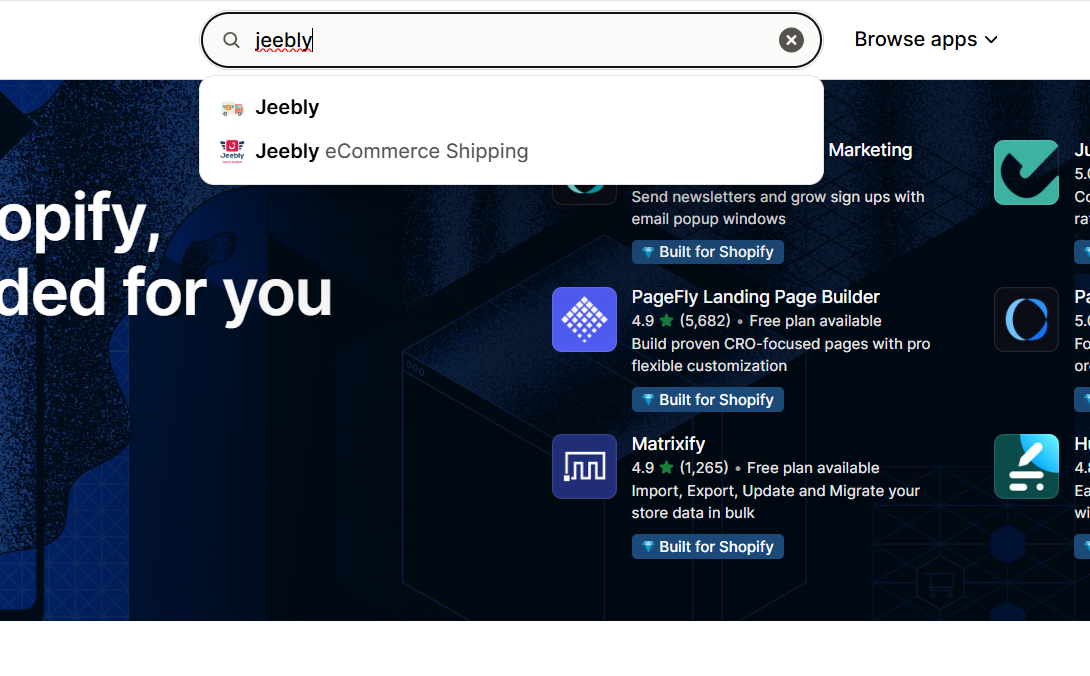
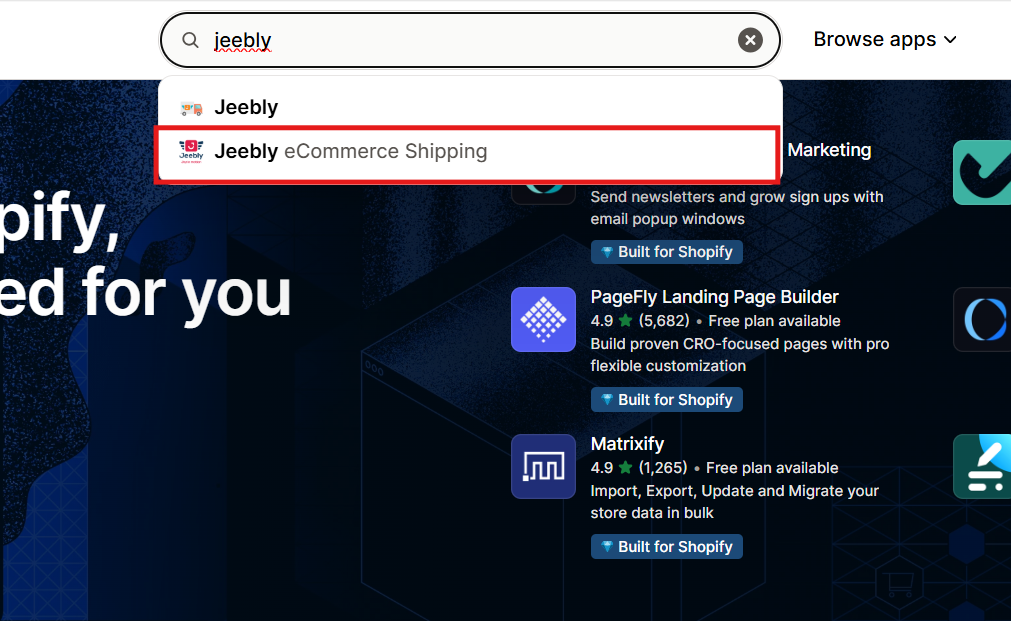
Search for “Jeebly”

In the Shopify App Store search bar, type “Jeebly”.

Search for Jeebly
Search for “Jeebly” in App Store.
Step 5 • Select Listing
Step 5

Select Jeebly Plugin

From search suggestions, select Jeebly eCommerce Shipping.

Select Jeebly eCommerce Shipping
Choose the official Jeebly eCommerce Shipping app.
Step 6 • Install App
Step 6

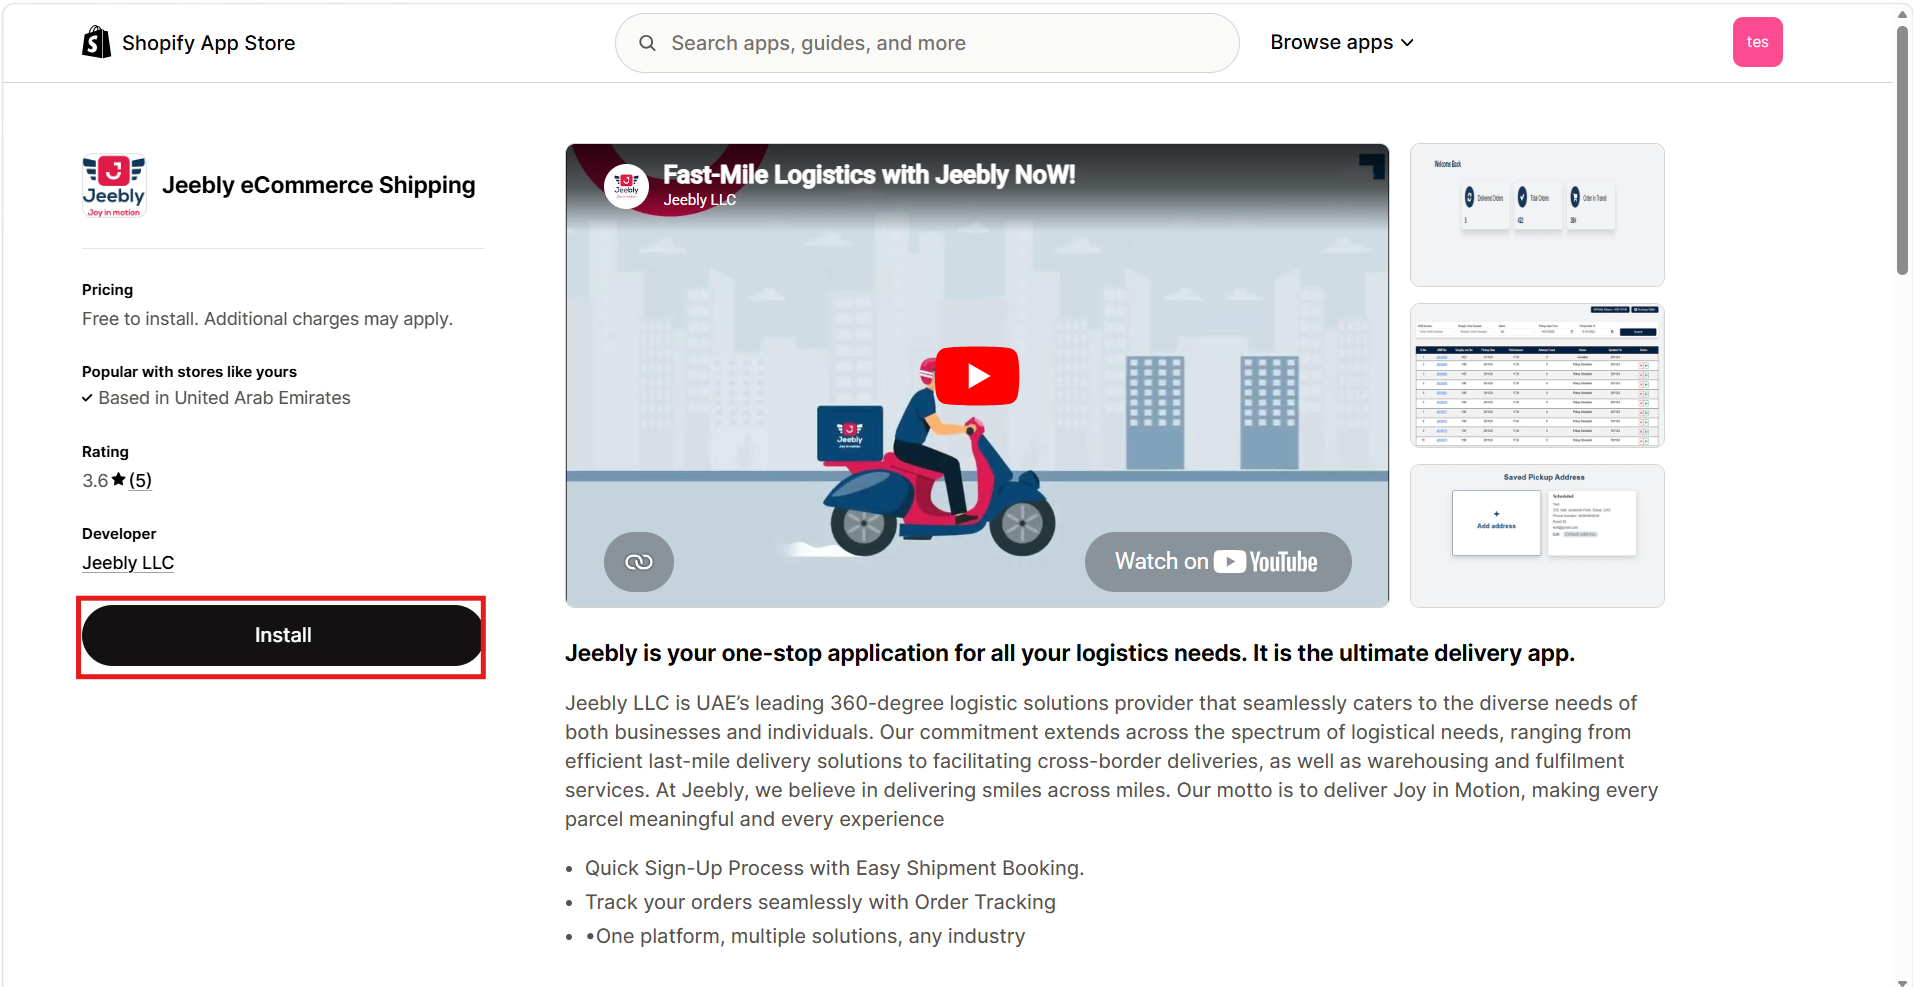
Click Install

On the app listing page, click Install to add the plugin.

Install Jeebly Plugin
Click Install to approve store integration permissions.
Step 7 • App Installed
Step 7

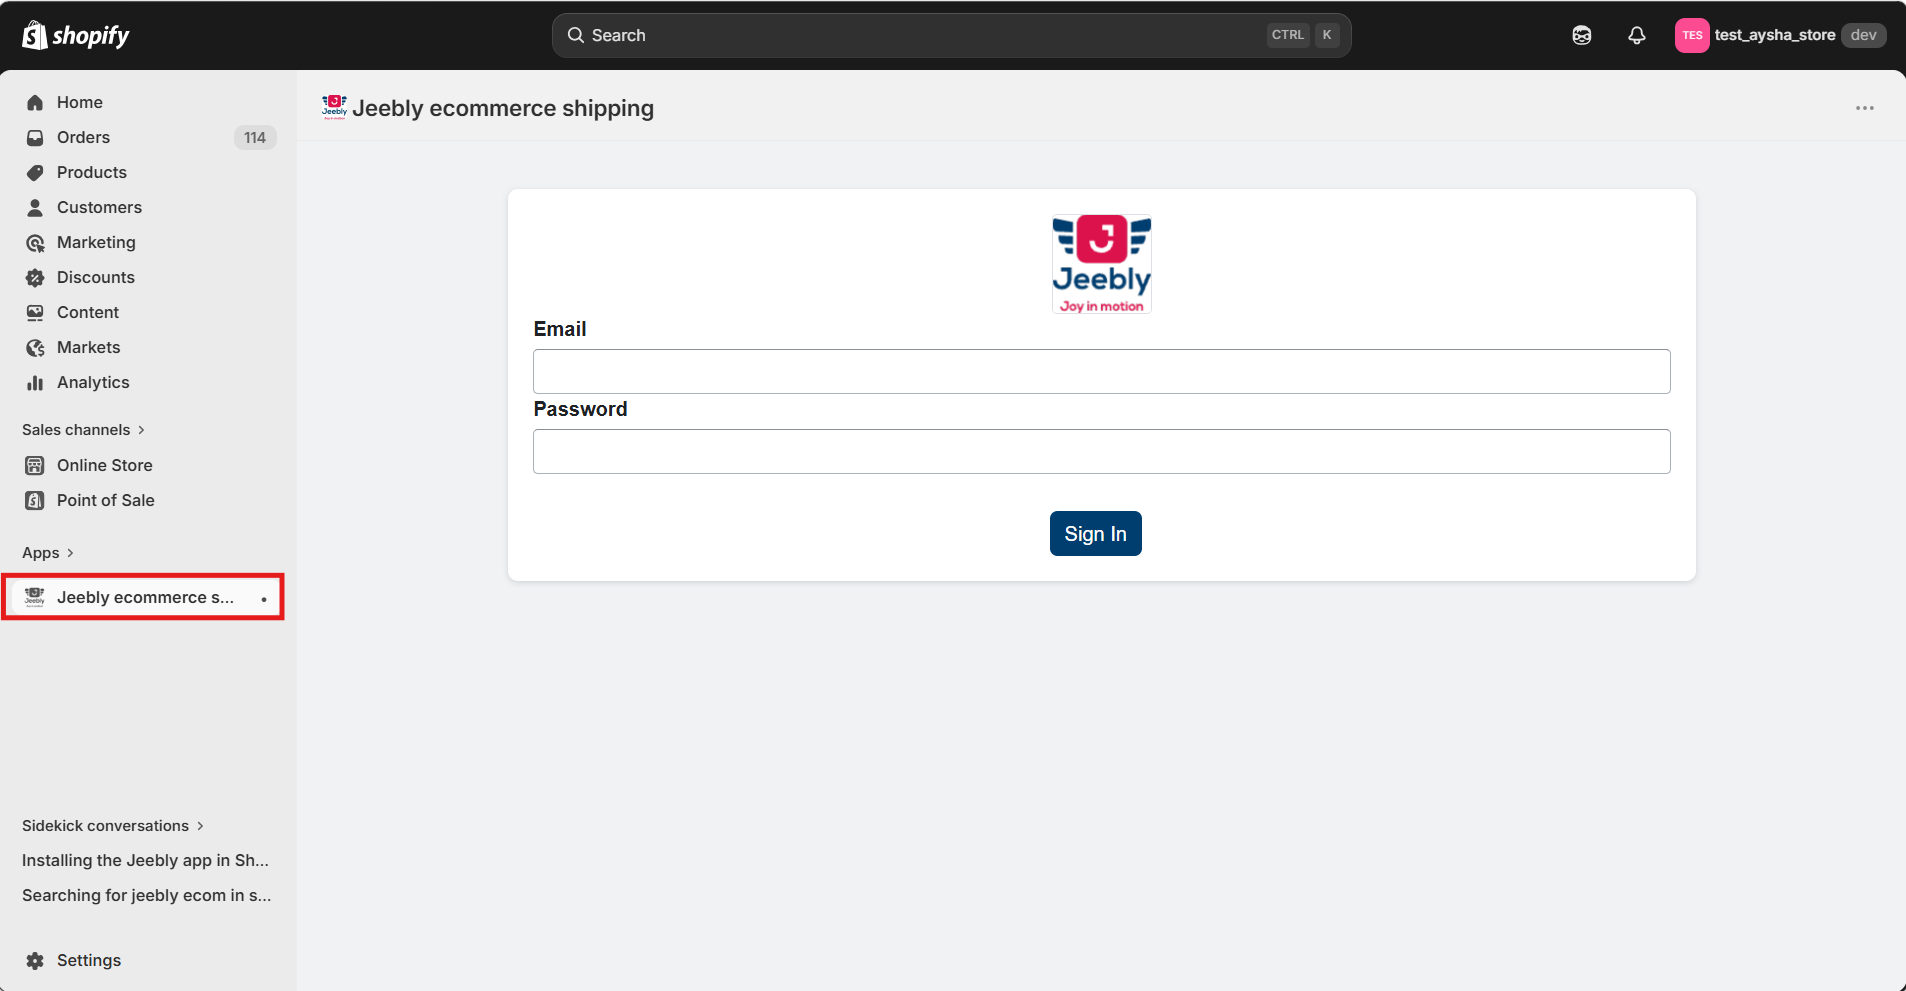
Access Under Apps

Click on Jeebly under Apps in sidebar and sign in with credentials.

Jeebly app under Apps
Access Jeebly under Apps in your left sidebar.

Installed Plugin Navigation

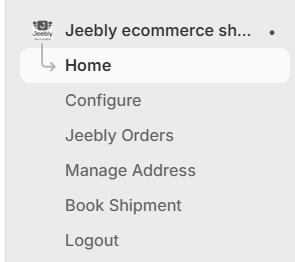
After installation, the Jeebly app appears in the left sidebar under Apps as “Jeebly ecommerce shipping”, providing direct access to the following operational sections:

Home Configure Jeebly Orders Manage Address Book Shipment Logout
Ready for one-time portal sign in.
3

Authentication (Sign In)

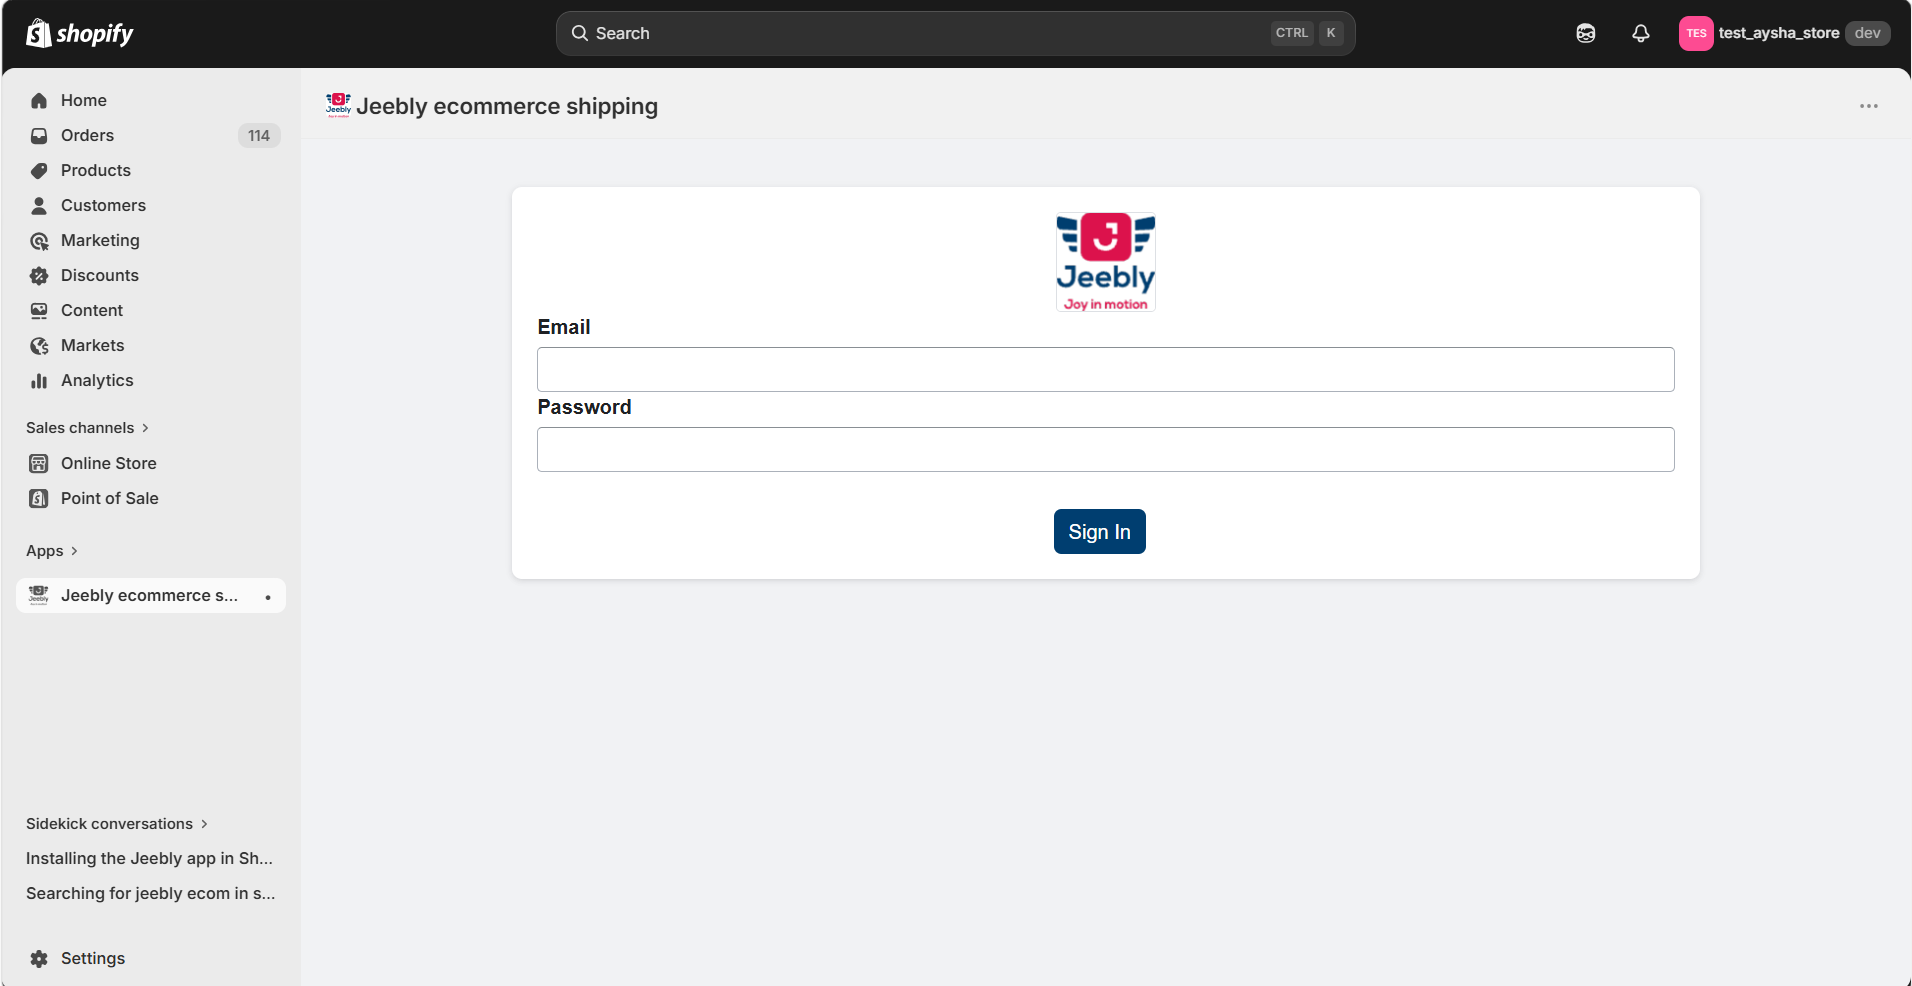
After installing the plugin, click on the Jeebly app in your sidebar. You will be presented with a sign-in screen. Enter your my Jeebly credentials:

Field Value
Email <your Jeebly portal email>
Password <your Jeebly portal password>
Jeebly Portal Sign In Screen
Shopify Plugin Sign In Screen
Figure: Jeebly Shopify Plugin Sign In Screen.
4

Home Dashboard

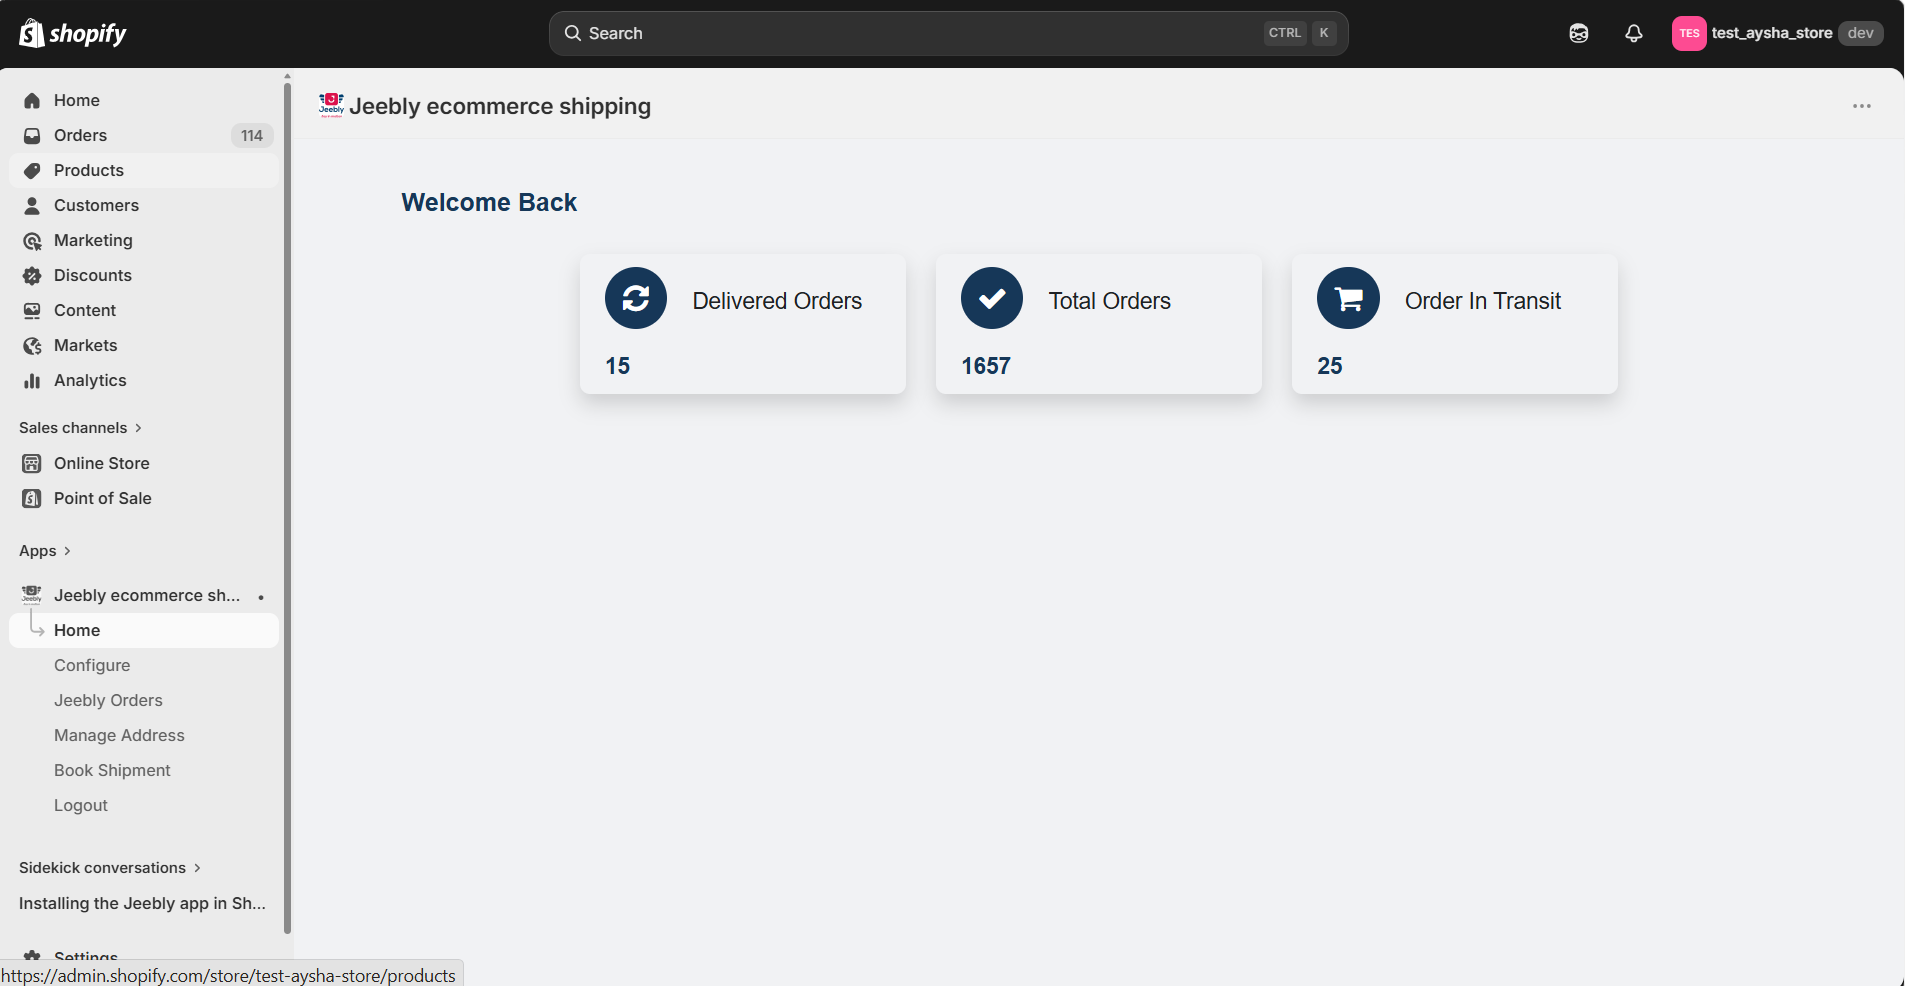
After signing in, you are taken to the home dashboard. This page provides a real-time summary of shipment activity in three tiles:

Tile Description
Delivered Orders Count of all shipments that have been successfully delivered.
Total Orders Total count of all shipments ever created through the plugin.
Order In Transit Count of shipments currently in transit/out for delivery.
Dashboard • Metrics Summary
Dashboard Tiles
Figure: Jeebly Shopify Home Dashboard Metrics.

Plugin Sidebar Navigation

The left sidebar, once logged in, provides direct access to all essential shipping operations:

Home: View real-time shipment activity tiles.
Configure: Manage automatic order sync settings.
Jeebly Orders: Track orders and print AWB labels.
Manage Address: Set default pickup addresses.
Book Shipment: Manually book individual consignments.
Logout: Securely exit your Jeebly account.
Accessible anytime directly from your Shopify store admin.
Sidebar Sub-menu Navigation
Plugin Sidebar Navigation
Figure: Plugin Left Sidebar Sub-menu Navigation.
5

Manage Address

The Manage Address section allows you to configure and save default pickup location details for your consignments. This must be completed before using the Auto-Sync feature.

Adding a New Pickup Address

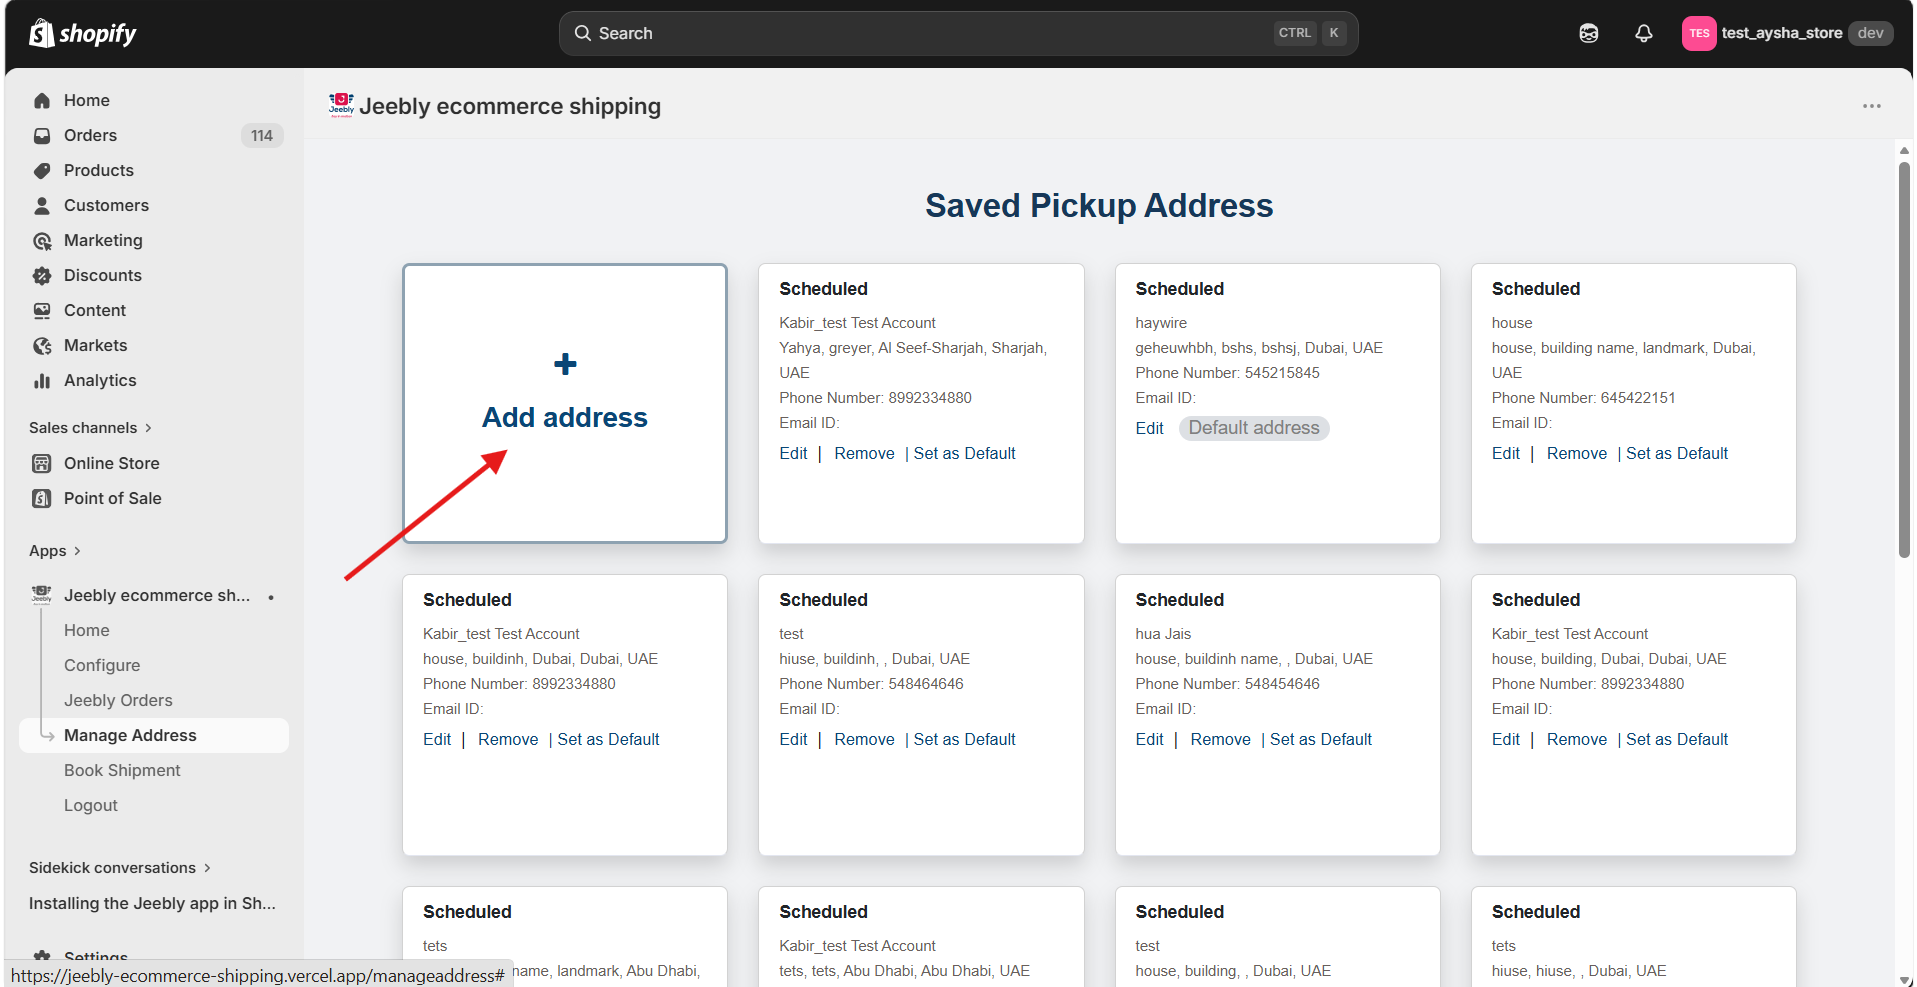
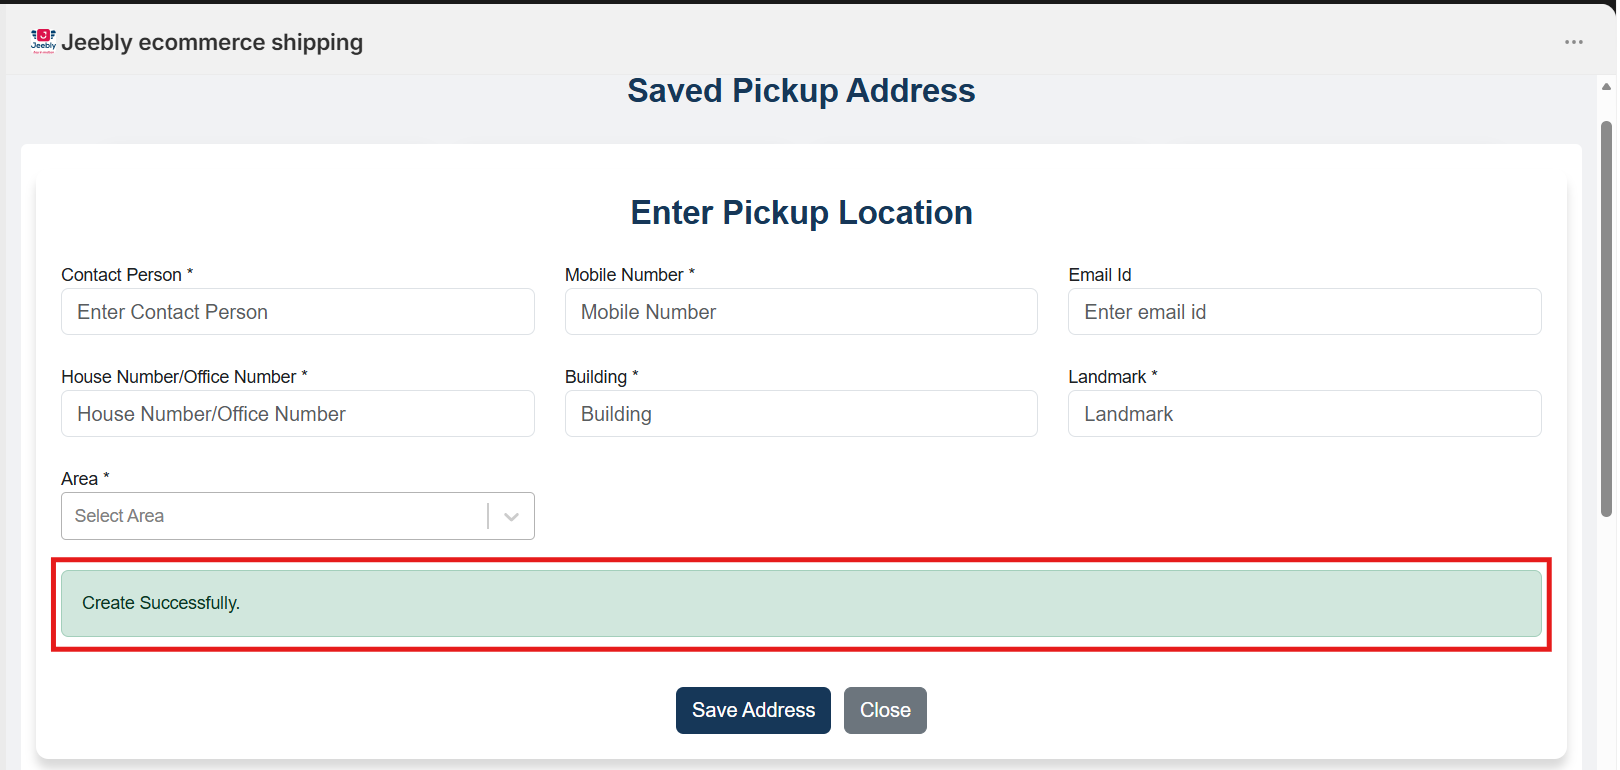
Click + Add Address to open the Enter Pickup Location form. Fill in the following required fields:

Field Required? Notes
Contact Person Yes Name of the pickup contact
Mobile Number Yes Contact phone number
Email Id No Optional email address
House Number / Office Number Yes Unit/flat/office number
Building Yes Building name
Landmark Yes Nearby landmark
Area Yes Select from dropdown list

Click Save Address to save. A green confirmation message “Create Successfully.” will appear.

Add Pickup Location
Manage Address Interface
Figure: Adding New Pickup Address.
Saved Pickup Addresses
Figure: Saved Pickup Addresses & Confirmation.

Managing Saved Addresses

Saved addresses appear on the Saved Pickup Address page. For each address you can:

  • Edit — Modify address details
  • Remove — Delete the address
  • Set as Default — Mark as the default pickup address for auto-sync
⚠ PLEASE NOTE: The pickup address is mandatory for the Auto Sync order option to work. Without a saved and default pickup address, automatic order syncing will not function.
6

Configure (Auto-Sync)

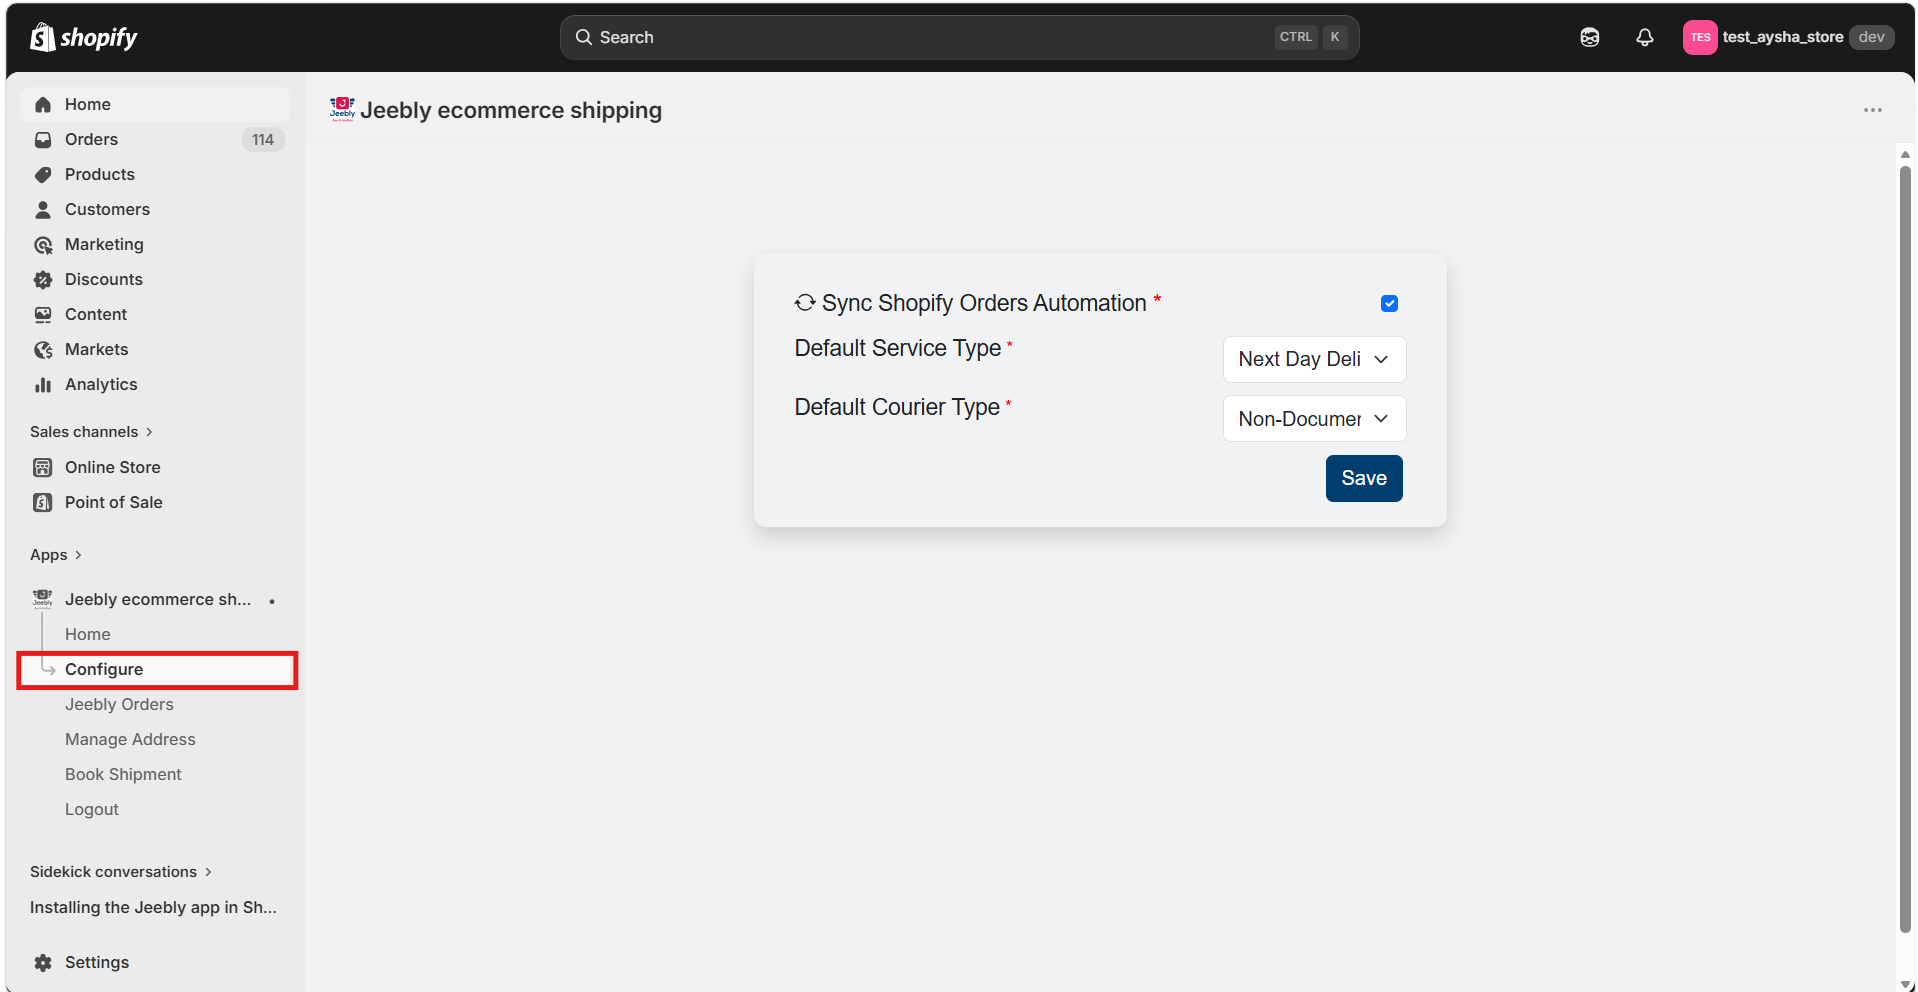
The Configure section allows you to set up automatic order syncing from Shopify to Jeebly. When enabled, every new order in your Shopify store is automatically pushed to Jeebly using the settings defined here.

Configuration Fields

Setting Description
Sync Shopify Orders Automation Toggle checkbox to enable/disable auto-sync. When checked, new Shopify orders are automatically pushed to Jeebly.
Default Service Type Select the delivery service level: Next Day Delivery (NDD) or Same Day Delivery (SDD).
Default Courier Type Select Document or Non-Document from the dropdown.

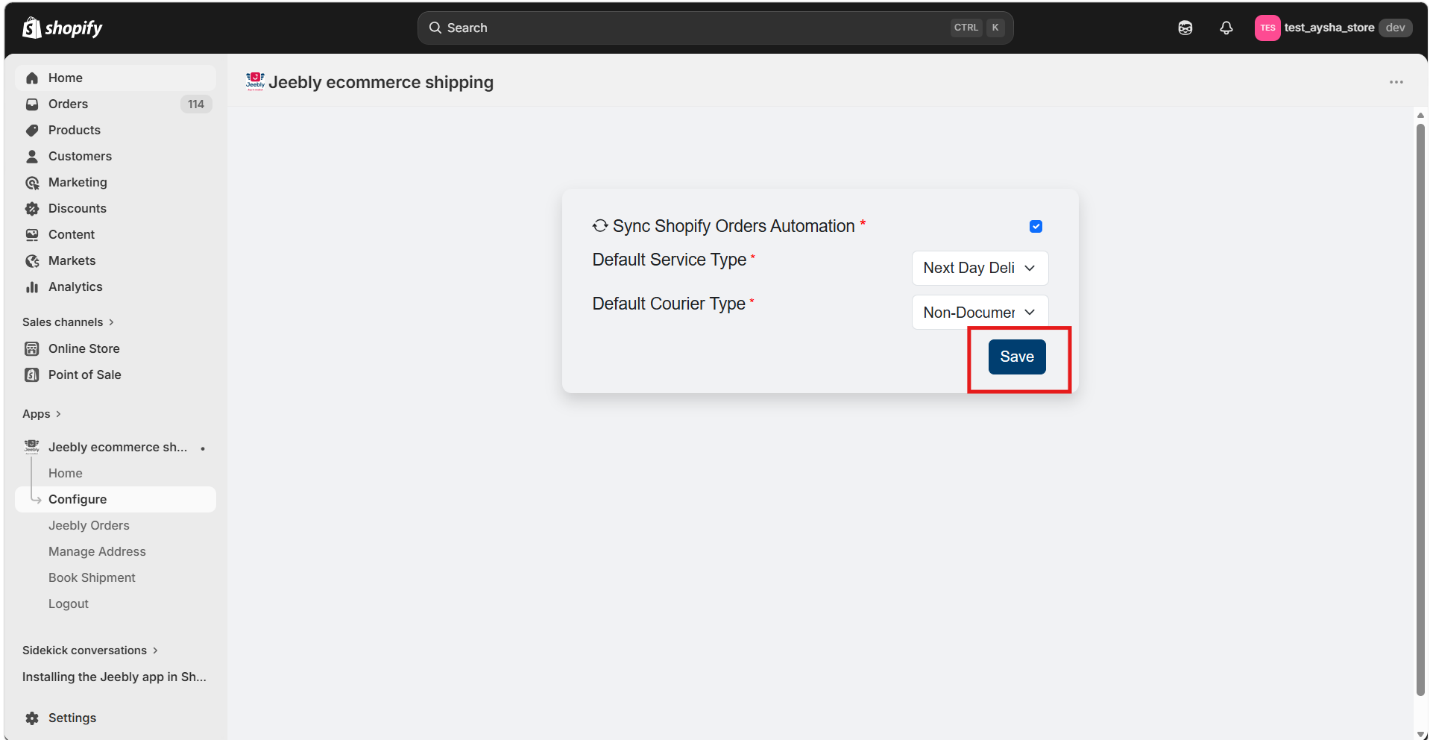
After making your selections, click Save to apply.

Configure Auto-Sync
Configure Auto-Sync
Figure: Auto-Sync Configuration Screen.
Save Configuration
Save Configuration
Figure: Save Auto-Sync Configuration.
⚠ PLEASE NOTE: Sync Orders is a non-mandatory option. If it is not enabled, you can still manually push orders to Jeebly through the Book Shipment section of the Shopify plugin.
Auto-Sync Failure Conditions: Orders will NOT sync automatically if:
  • The delivery address details are missing;
  • The number of items exceeds 10 pieces;
  • The shipment weight exceeds 20 kg;
  • The COD value exceeds 5,000 AED.
No notification will be sent in these cases — verify all order data is complete.
7

Book Shipment (Manual)

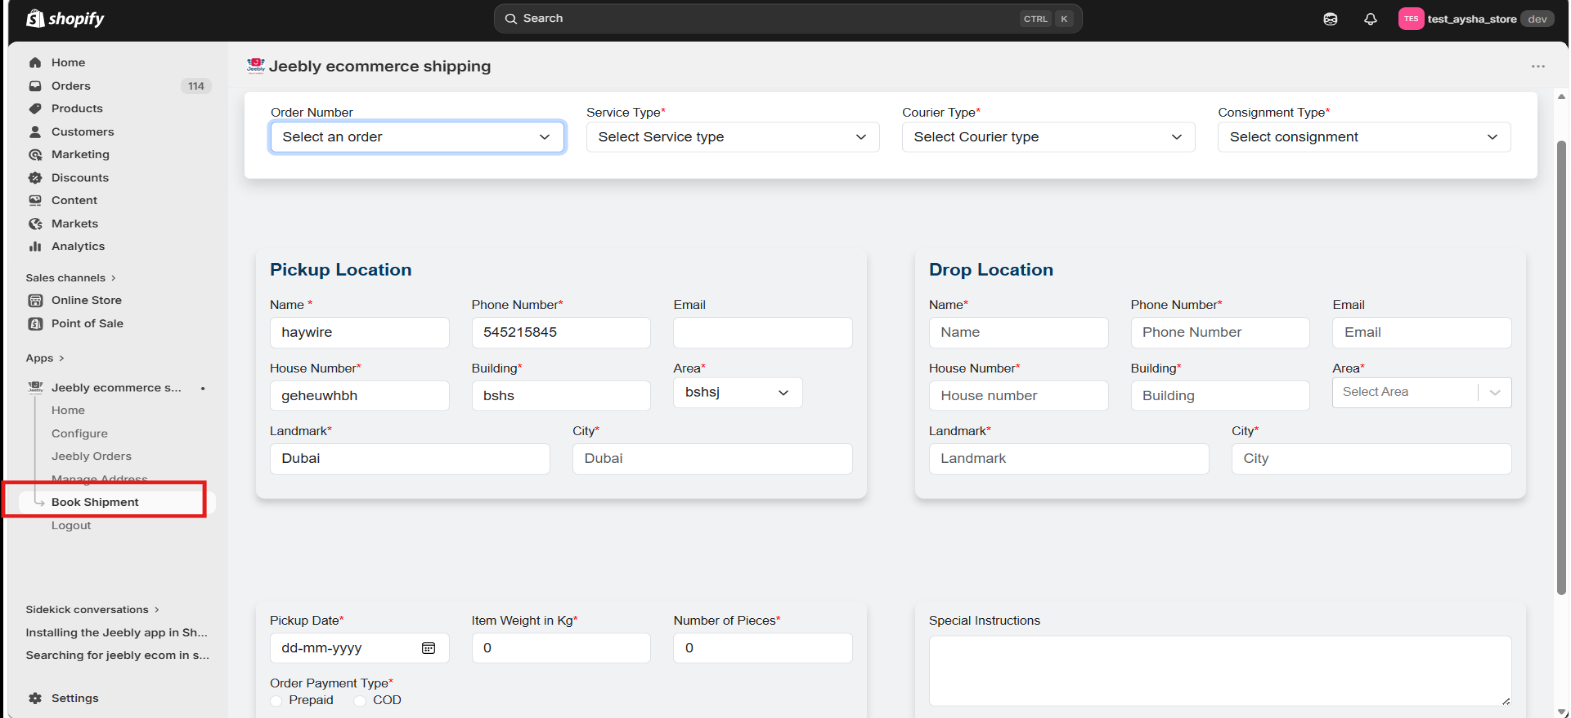
The Book Shipment section allows you to manually push individual orders from Shopify to the Jeebly system. This is a manual process requiring all mandatory fields to be completed.

Mandatory Fields

Field Section Notes
Order Number Header Select from your Shopify orders
Service Type Header SDD or NDD
Courier Type Header Document or Non-Document
Consignment Type Header Select consignment category
Name Pickup Location Contact name at pickup
Phone Number Pickup Location Contact mobile number
House Number Pickup & Drop Unit/flat number
Building Pickup & Drop Building name
Area Pickup & Drop Select area from dropdown
Landmark Pickup & Drop Nearby landmark
City Pickup & Drop City name
Pickup Date Details Date for pickup (dd/mm/yyyy)
Item Weight in Kg Details Must be 20 kg or less
Number of Pieces Details Must be 10 or fewer
Order Payment Type Details Prepaid or COD
COD Amount Details Required if payment type is COD

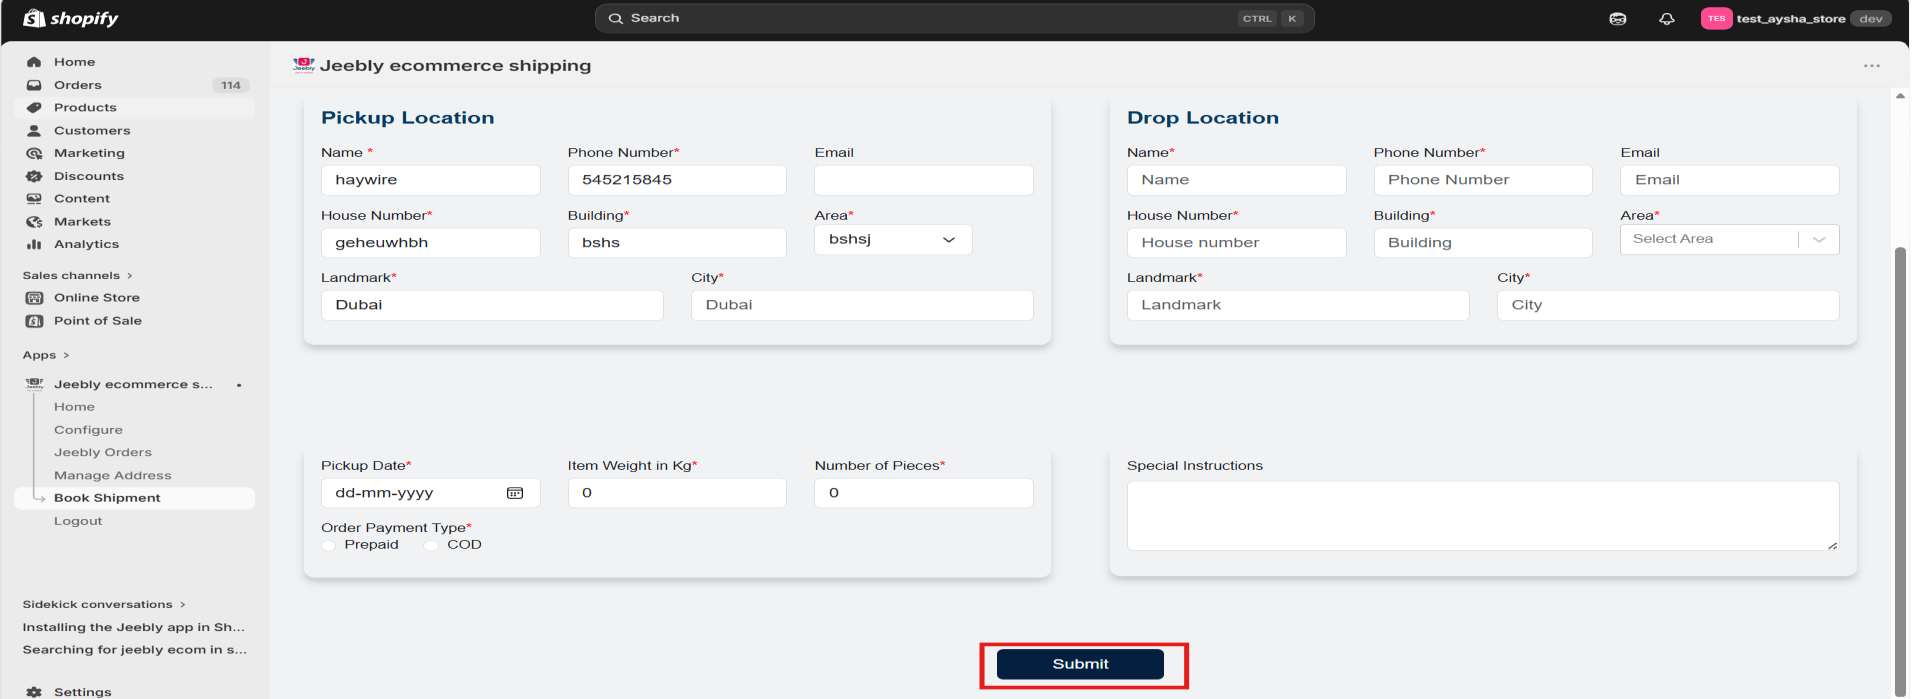
Once all mandatory fields are completed, click Submit to create the shipment in the Jeebly system.

Manual Booking Form
Manual Booking Form
Figure: Manual Booking Form Interface.
Submit Booking
Submit Manual Booking
Figure: Submit Manual Booking Order.
Note: Zero and decimal values are not permitted in the Number of Pieces or Item Weight fields. Whole numbers only.
8

Jeebly Orders

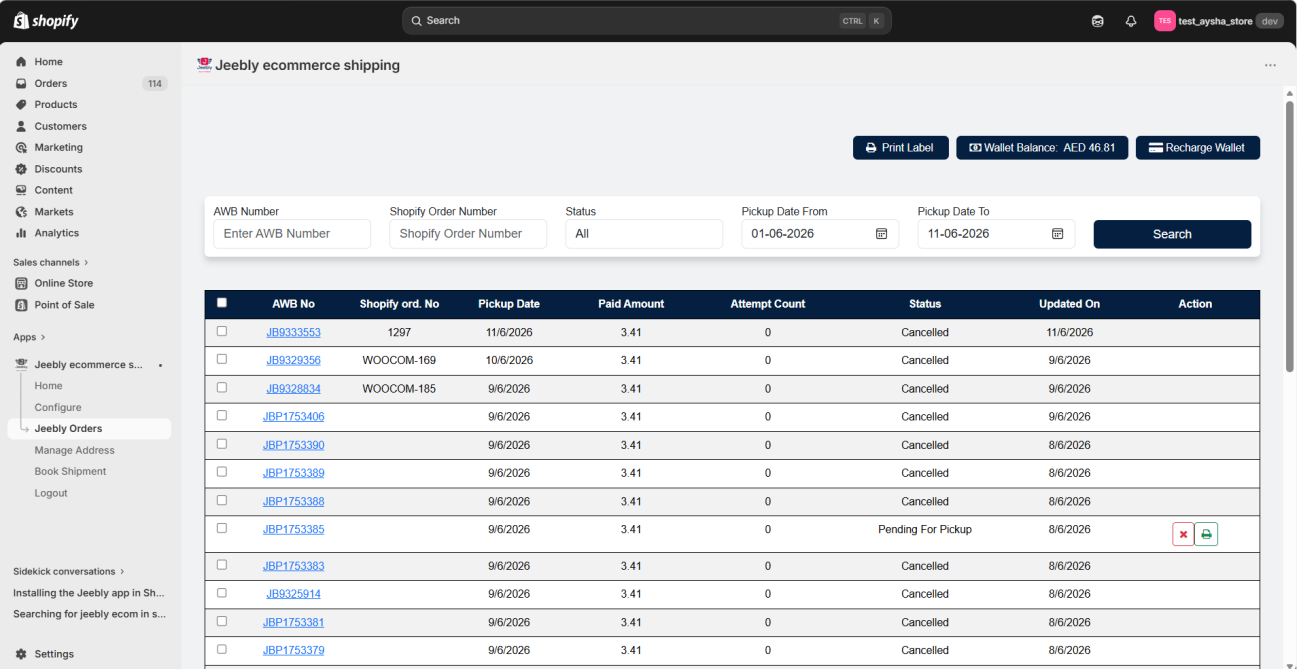
The Jeebly Orders page provides a full list of shipments that have been synced with the Jeebly system. It includes filtering, wallet management, and action capabilities.

Jeebly Orders List Screen
Jeebly Orders List
Figure: Jeebly Orders Dashboard & Tracking Table.

Page Elements

Element Description
Wallet Balance (AED) Displays your current Jeebly account wallet balance in AED.
Recharge Wallet button Redirects you to the Jeebly Wallet top-up page to add funds.
Print Label button Prints the AWB label(s) for selected shipments.
AWB Number filter Filter shipments by entering a specific AWB number.
Shopify Order Number filter Filter by Shopify order number.
Status filter Filter by shipment status (All, Pickup Scheduled, In Transit, Delivered, Cancelled, etc.).
Pickup Date From / To Date range filter for pickup date.
Search button Applies the selected filters.
AWB No (clickable link) Opens the Jeebly shipment tracking page for real-time status updates.
Cancel (✕) button Cancels the shipment. Only available before status reaches Pickup Completed.
Print (printer icon) Prints the AWB label for the specific shipment row.

Order Table Columns

The order table displays the following columns: AWB No, Shopify Ord. No, Pickup Date, Paid Amount, Attempt Count, Status, Updated On, and Action.

Cancellation

To cancel a shipment:

  • The shipment status must be Pickup Scheduled (not yet collected by courier).
  • Click the ✕ (Cancel) button in the Action column.
  • Cancellation will trigger an automatic refund, reflected on the Jeebly SSP Transaction page.
  • Once synced to Jeebly, cancellation cannot be done from within the Shopify plugin if the status has progressed beyond Pickup Scheduled — use the Jeebly app directly in that case.

Shipment Tracking

Click on any AWB number link (e.g., JB9297420) in the AWB No column to open the Jeebly shipment tracking page, where you can monitor real-time delivery status.

9

Shipment Creation Rules

All shipments created through the Jeebly Shopify plugin must comply with the following operational rules. Non-compliance will cause sync failures or booking errors.

Service Type Rules

Service Cutoff & Restrictions
Same Day Delivery (SDD) Order must be created before 11:00 AM if pickup date = order date. Can be booked for any day except Sundays.
Next Day Delivery (NDD) Order must be created before 4:00 PM if pickup date = order date. Can be booked for any day except Sundays.

General Rules

  • Sundays are restricted — no shipments can be booked or picked up on Sundays.
  • Intercity Same Day Delivery is not available.
  • Maximum 10 pieces per shipment.
  • Maximum 20 kg total weight per shipment.
  • Maximum COD value: 5,000 AED.
  • Zero and decimal values are not permitted in pieces or weight fields.
  • Shipment editing is not available once a shipment is created.
  • Once synced with Jeebly, a shipment cannot be cancelled via the Shopify plugin unless the status is Pickup Scheduled.
  • COD payments require Bank Account and KYC verification on your Jeebly account for settlement.

Ready to Deliver Joy at Scale?

Integrate your Shopify store with Jeebly today and leverage seamless last-mile fulfillment across the UAE.

Install Shopify Plugin
On This Page
Need Help?

Have questions regarding your Shopify store integration? Our integration engineering team is ready to assist.