Jeebly
Jeebly WooCommerce Plugin Integration Guide • v2.0

Jeebly WooCommerce Plugin
Integration Guide

Joy in motion

Abstract This document details the complete setup and operational workflow for the Jeebly WooCommerce Plugin. It covers step-by-step installation, authentication, address management, shipment configuration, manual booking, order tracking, and all operational rules.
Install from WordPress.org
Version: v2.0 PHP 8.1 (Core PHP) MySQL 8.1 WordPress Directory

WooCommerce

Official Jeebly Delivery Partner Plugin

Setup Time:< 15 mins
Compatibility:WordPress 6.0+
WooCommerce:Latest version
Quick Start Installation
1

Overview

The Jeebly WooCommerce Plugin seamlessly integrates your WordPress WooCommerce store with the Jeebly logistics platform. It supports automatic order synchronization, manual shipment booking, real-time order tracking, AWB label printing, and wallet management — all from within the WordPress Admin Dashboard.

Auto Order Sync Automatic push on new orders.
Manual Booking Book orders on demand.
AWB Labels Instant shipping label printing.
Wallet Balance Monitor credit in real-time.

Plugin URL

Install from the WordPress Plugin Directory:

https://wordpress.org/plugins/jeebly-delivery-partner/ Open WordPress.org
2

Requirements

The following requirements must be met to ensure the smooth operation of the plugin:

Component Requirement
PHP PHP 8.1 (Core PHP)
Database MySQL 8.1
Frontend — HTML Standard HTML5
Frontend — CSS Tailwind CSS v3.4.17
Frontend — JS JavaScript / jQuery v3.7.1
WordPress Latest version
WooCommerce Latest version — must be installed and activated before installing this plugin
3

Installation

⚠ IMPORTANT: We strongly recommend creating a complete backup of your store's files and database before performing any installation, update, or removal of the plugin. Always verify installation on a staging/testing environment before deploying to production.

Pre-Installation Check

Ensure the WooCommerce plugin is already installed and activated on your WordPress site before proceeding.

Installing the Plugin — Step by Step

Step 1 • WP Admin
Step 1

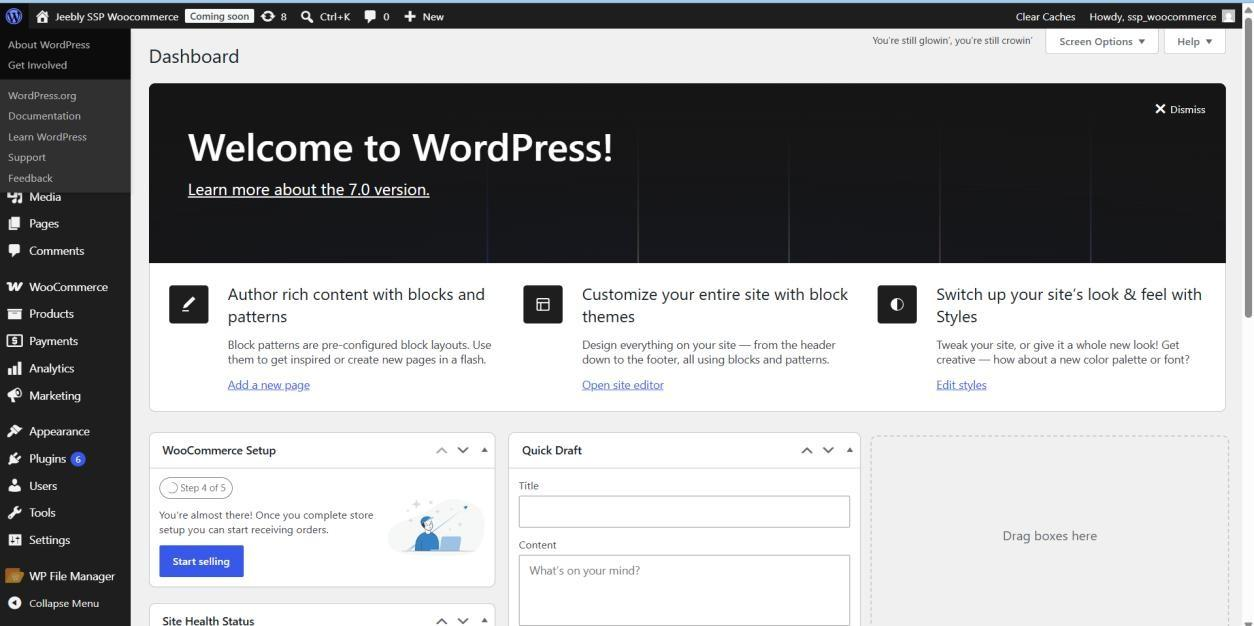
Log in to WP Dashboard

Log in to your WordPress Admin Dashboard with administrator credentials.

Log in to WordPress Admin
Access the WordPress admin dashboard.
Step 2 • Add Plugins
Step 2

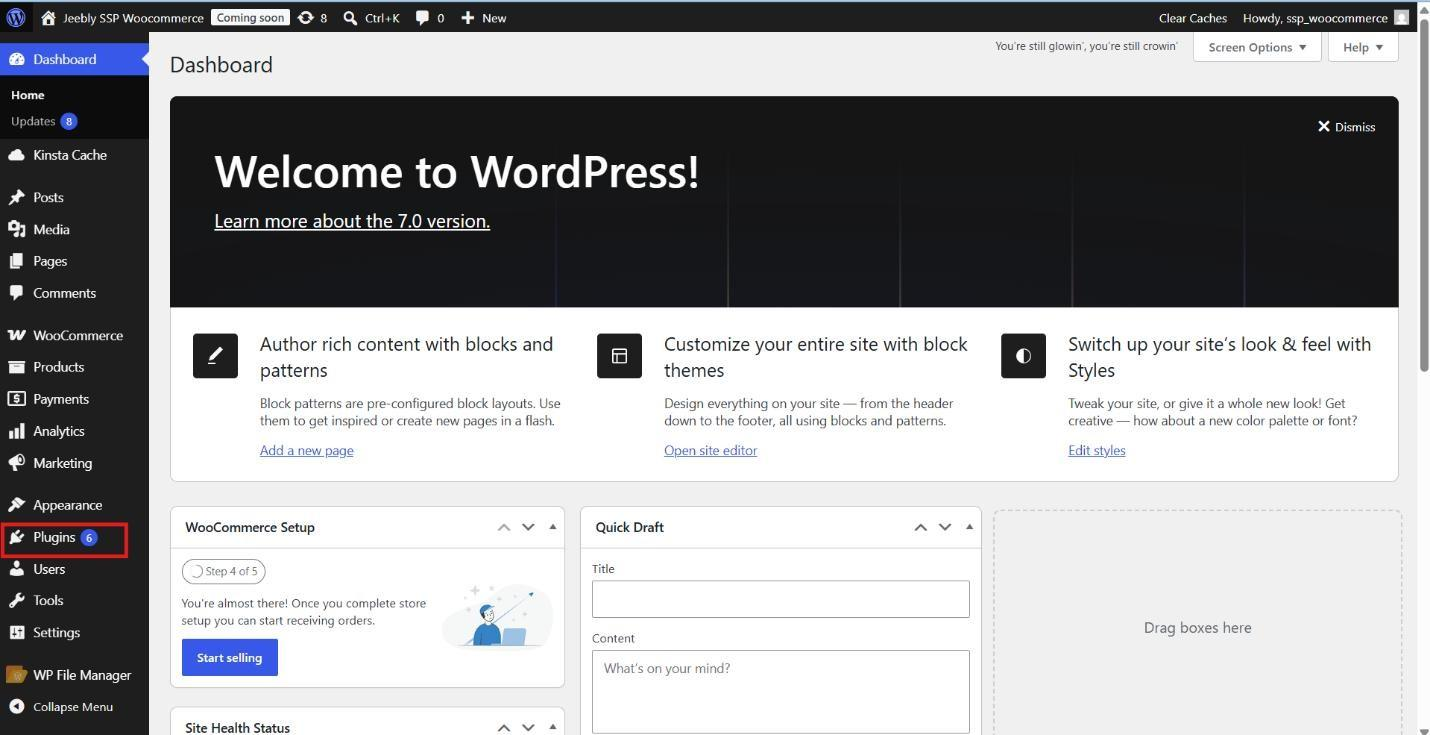
Navigate to Add Plugins

Navigate to Plugins → Add New in the left sidebar menu.

Plugins Add New
Open Plugins → Add New in WordPress.
Step 3 • Upload Action
Step 3

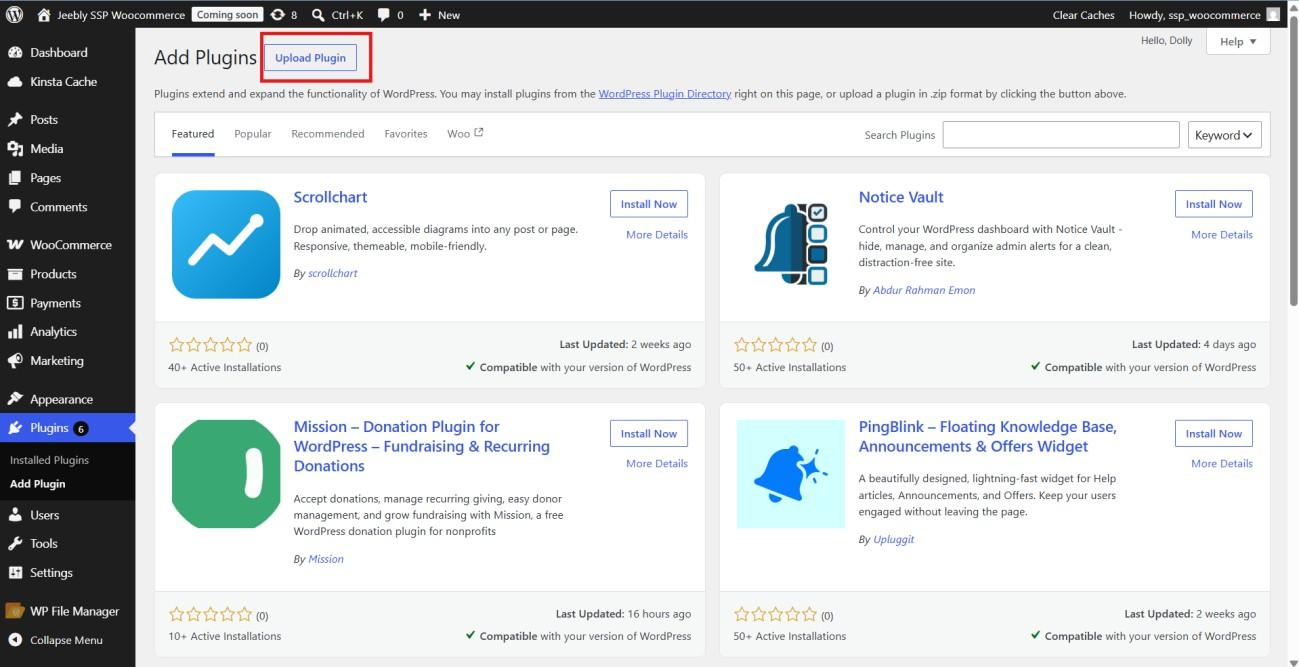
Click Upload Plugin

Click on the Upload Plugin button at the top of the page.

Upload Plugin
Click Upload Plugin button at top.
Step 4 • Choose Zip
Step 4

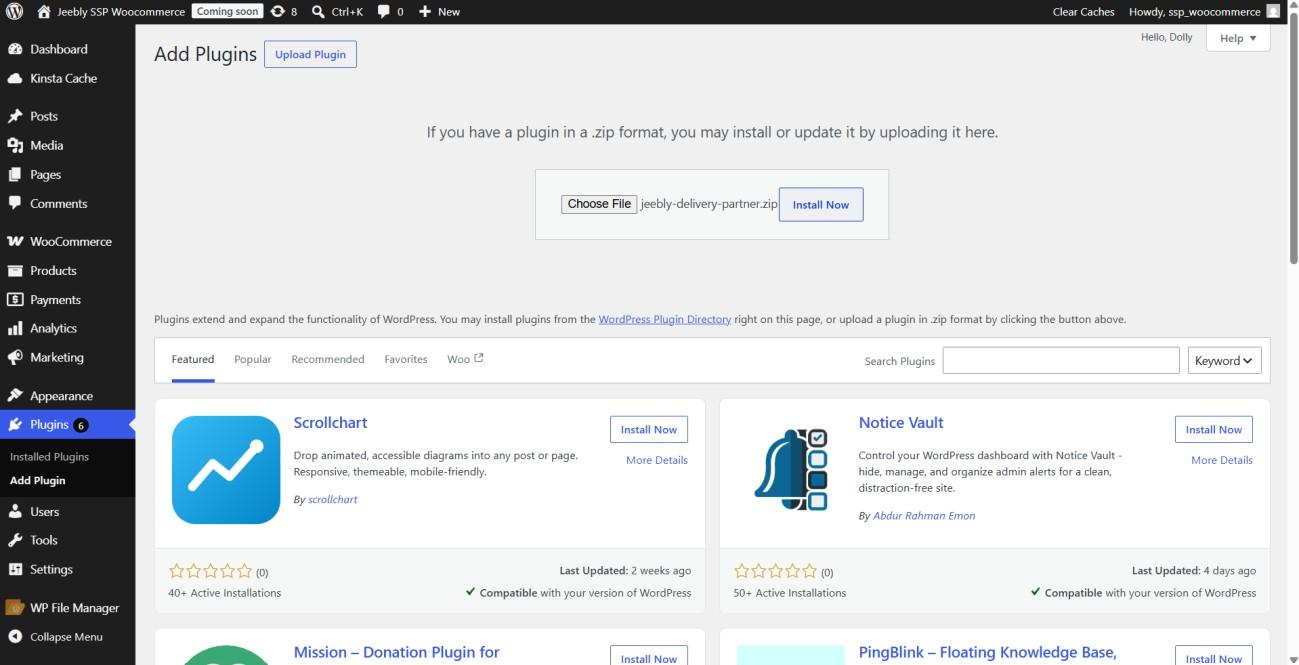
Choose *.zip File

Choose the *.zip file of the Jeebly plugin from your local system.

Choose Plugin Zip
Select downloaded Jeebly plugin zip file.
Step 5 • Installation
Step 5

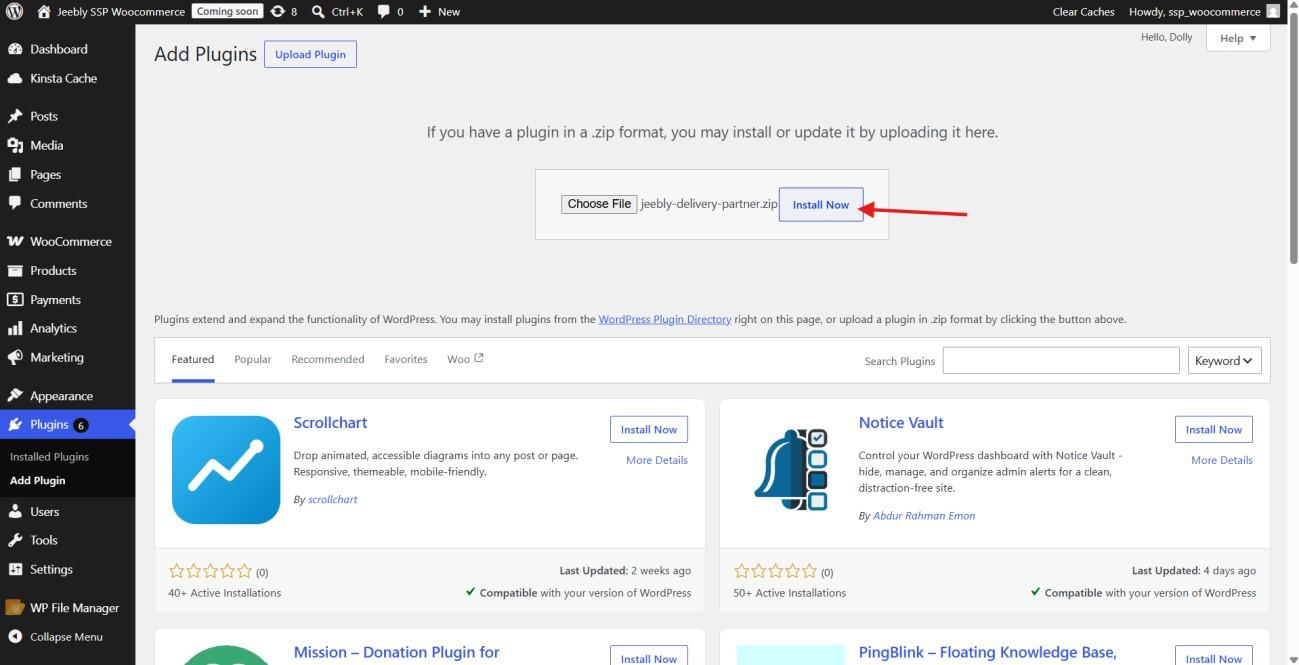
Click Install Now

Click Install Now to begin plugin archive installation.

Install Plugin Now
Click Install Now to extract and install.
Step 6 • Activation
Step 6

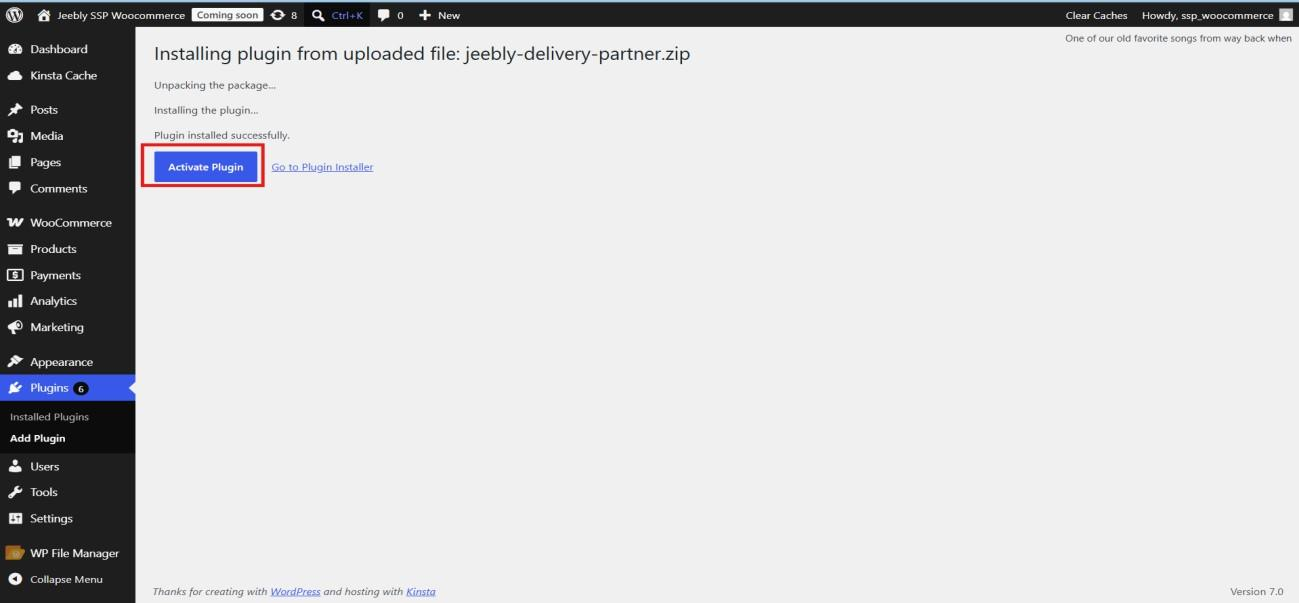
Activate Plugin

Once installed, click Activate Plugin to enable it on your store.

Activate Plugin
Click Activate Plugin to complete setup.

Post-Installation

Upon successful installation and activation, a new menu item titled Jeebly will appear in the left-hand sidebar of your WordPress Admin Dashboard. This section provides access to all plugin settings and integration configurations.

Sidebar Sub-Sections Available

The Jeebly sidebar menu includes the following sub-sections:

Dashboard Book Now Jeebly Orders Track Shipment Manage Address Settings
Ready for one-time portal credentials login.
Jeebly Submenu
Jeebly Left Sidebar Menu
Figure: Jeebly WordPress Admin Left-Hand Menu.
4

Authentication (Sign In)

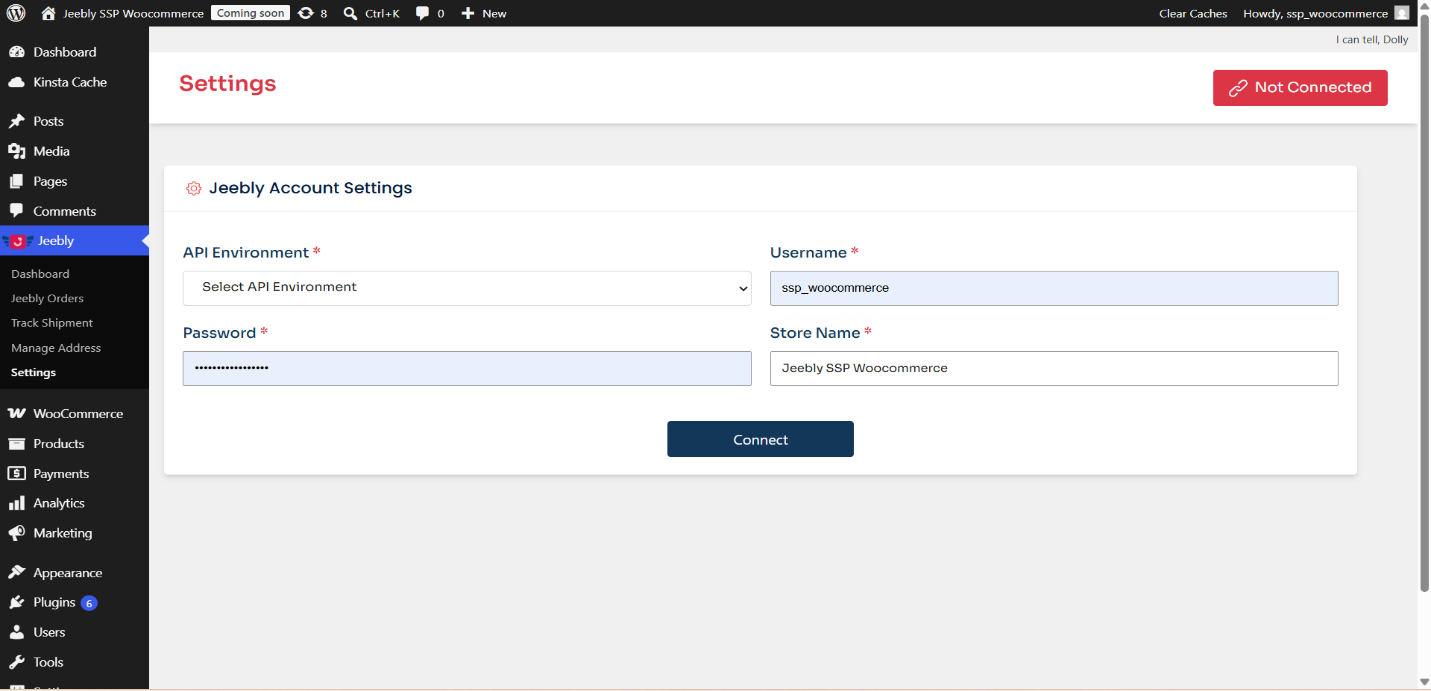
After activating the plugin, navigate to Jeebly → Settings in the WordPress Admin left-hand menu.

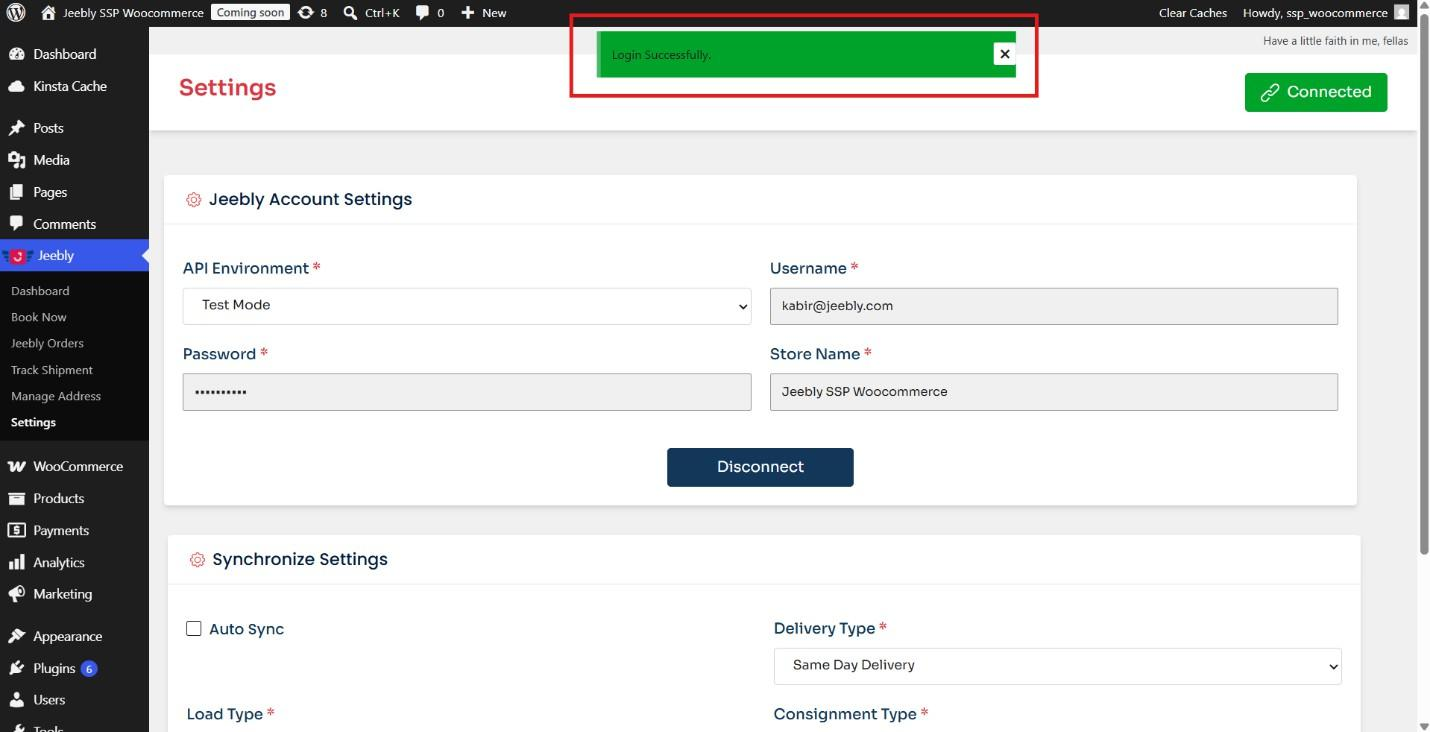
Login to the Plugin

Portal Credentials Login

  • Enter your Jeebly portal email and password.
  • Click Connect.
  • On success, green banner shows: “Login Successfully” and badge shows Connected.
Plugin Login
Figure: Plugin Authentication & Connection Status.
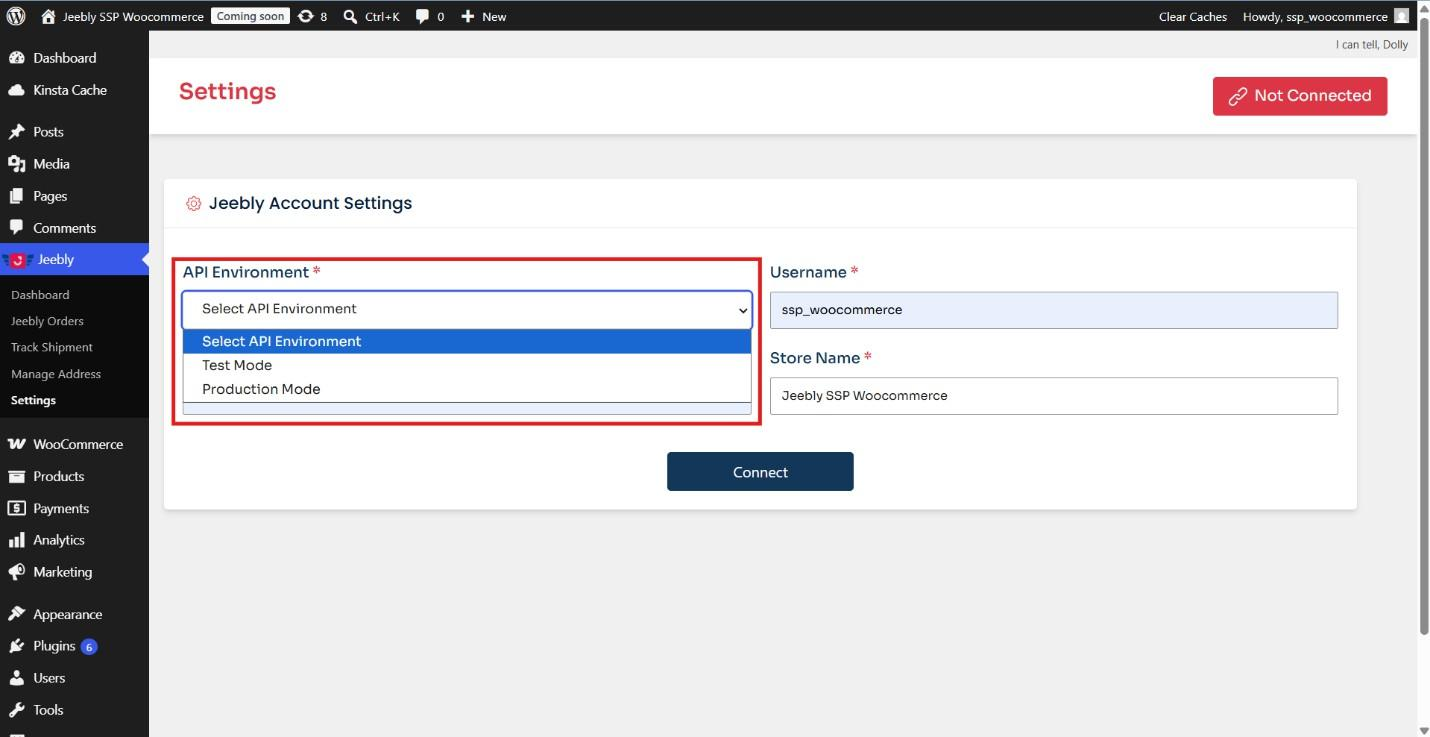
Select API Environment

API Environment Setup

  • Choose between Test Mode or Production Mode.
  • Enter corresponding credentials for chosen environment.
  • Store Name automatically reflects for both environments by default.
API Environment
Figure: Select Environment (Test vs Production).
Field Value
Email / Username Your Jeebly portal email address
Password Your Jeebly portal password
5

Home / Dashboard

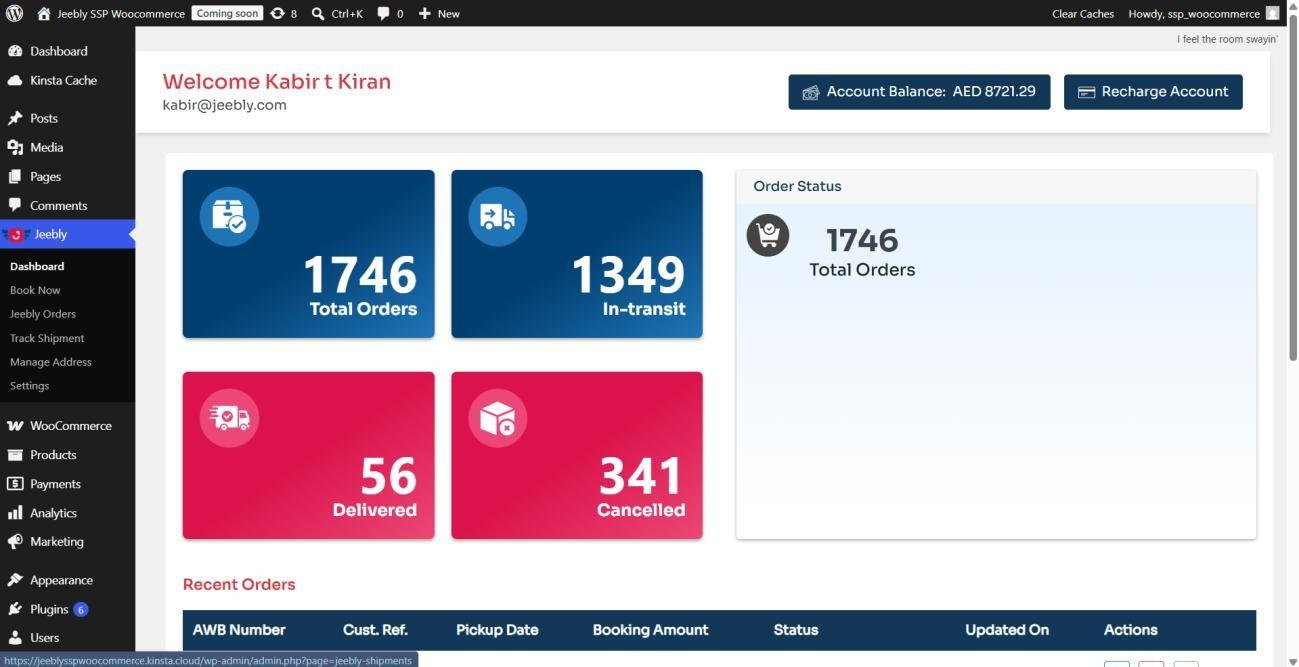
The Dashboard provides a real-time overview of your shipments and account information. Navigate to Jeebly → Dashboard to access it.

Dashboard Tiles
Dashboard Tiles
Figure: Real-time Shipment Metric Tiles.
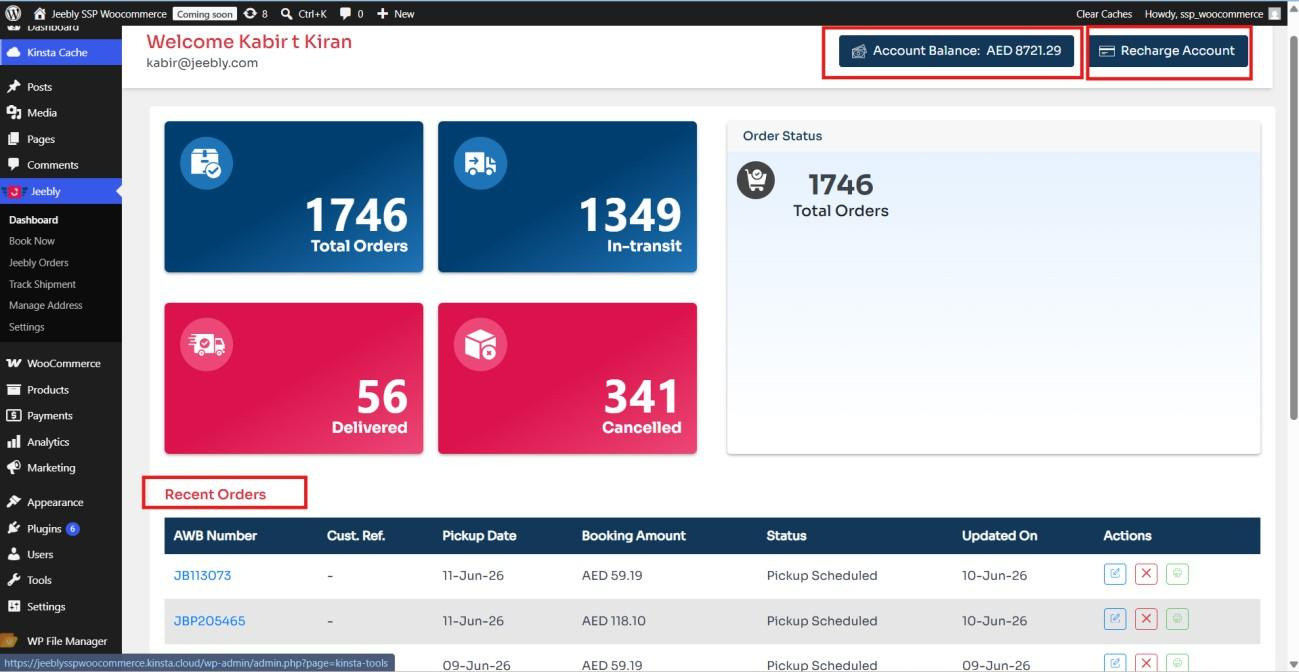
Dashboard Analytics & Wallet
Dashboard Analytics and Wallet
Figure: Status Analytics and Wallet Balance.

Dashboard Tiles

Tile Description
Total Orders Total count of all shipments created through the plugin.
In-Transit Count of shipments currently in transit or out for delivery.
Delivered Count of shipments successfully delivered.
Cancelled Count of cancelled shipments.

Other Dashboard Elements

Element Description
Shipment Status Bar Chart Visual chart displaying total orders categorised by current status.
Recent Orders A quick view of the most recently created or updated shipments.
Jeebly Account Balance Shows your current wallet balance linked to your Jeebly account.
Recharge Account Redirects to the Jeebly SSP account page where you can top up your wallet.
6

Manage Address

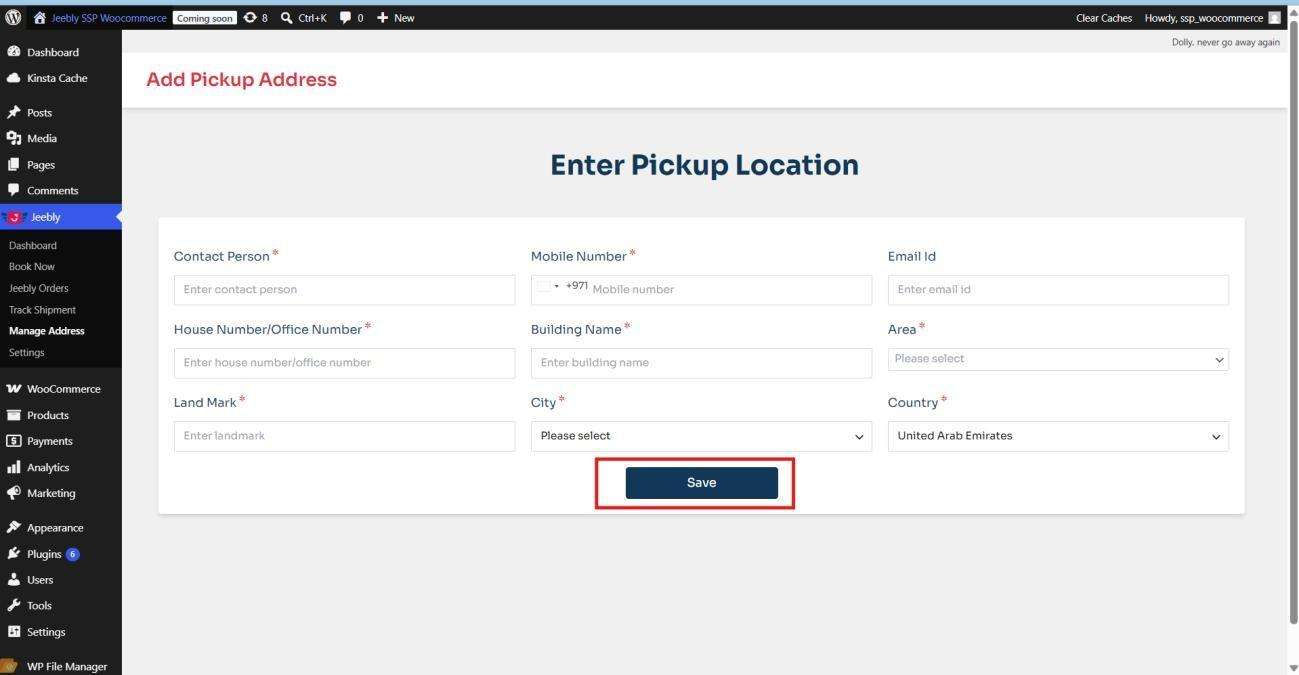
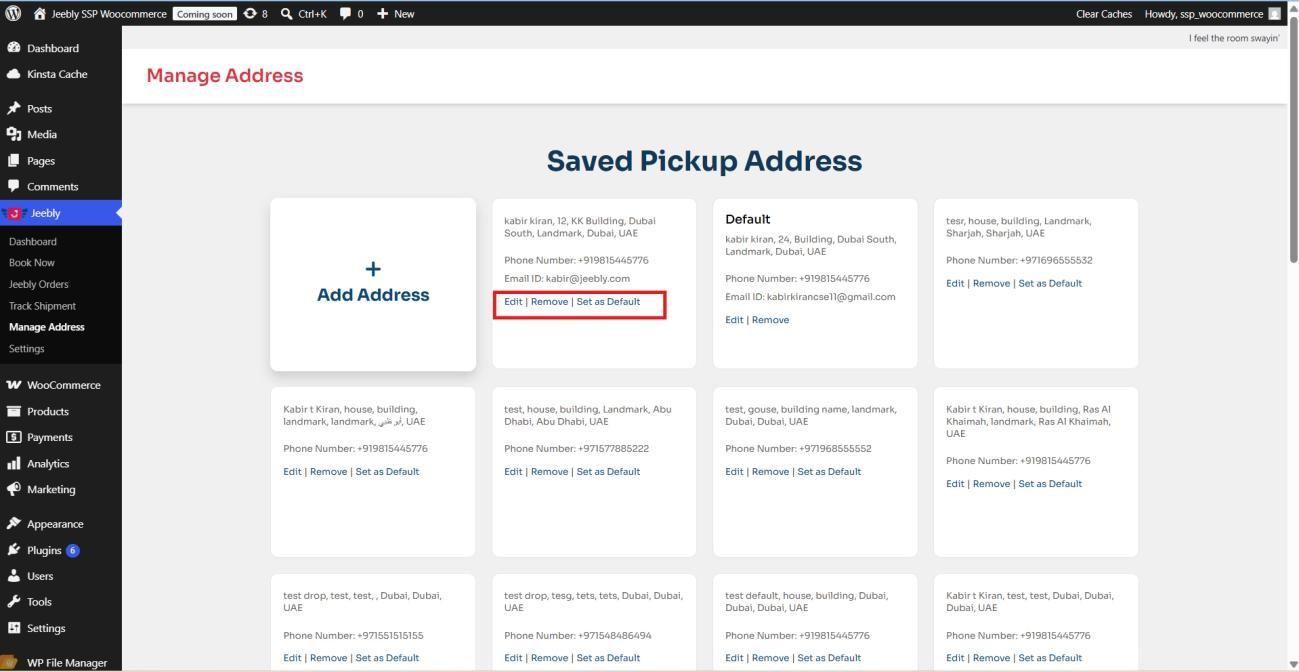
The Manage Address section allows you to configure and save default pickup location details for your consignments. Navigate to Jeebly → Manage Address.

⚠ NOTE: A saved and default pickup address is mandatory for the Book Shipment and Auto Sync features to function correctly.

Adding a New Pickup Address

Click + Add Address to open the Enter Pickup Location form and complete the required fields:

Field Required Notes
Contact Person Yes Name of the pickup contact
Mobile Number Yes Contact phone number with country code
Email ID No Optional email address
Villa / Apartment / Office Number Yes Unit, flat, or office number
Building Name Yes Full building name
Landmark Yes Nearby landmark for reference
Area Yes Select from dropdown list
City Yes City name

Click Save Address to save. A green confirmation message — “Create Successfully” — will appear.

Add Pickup Location Form
Add Pickup Address Form
Figure: Enter Pickup Location Form.
Saved Pickup Addresses
Saved Addresses List
Figure: Saved Pickup Addresses List.

Managing Saved Addresses

Saved addresses appear on the Saved Pickup Address page. For each address you can:

  • Edit — Modify address details
  • Remove — Delete the address
  • Set as Default — Mark as the default pickup address for Auto Sync
7

Configure (Auto-Sync) — Shipment Synchronization Settings

The Configure section allows you to set up automatic order synchronisation from WooCommerce to Jeebly.

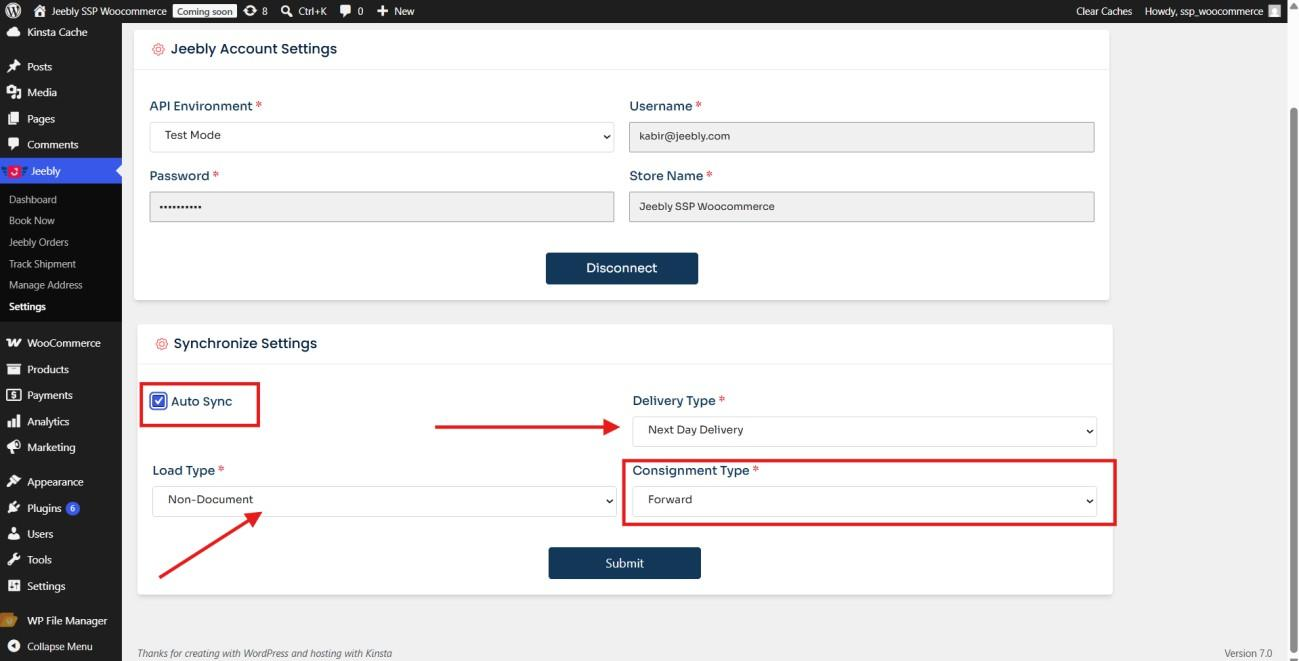
Enabling Auto-Sync

  • Within Jeebly Settings, scroll to the Synchronize Settings (Shipment Sync) section.
  • Tick the Auto Sync checkbox to activate automatic synchronisation.
  • Select your preferred Delivery Type (Next Day Delivery or Same Day Delivery).
  • Select the Load Type (Document or Non-Document).
  • Select the Consignment Type (Forward, etc.).
  • Click Submit to save.
Setting Description
Auto Sync Toggle to enable/disable automatic order synchronisation with Jeebly.
Delivery Type Select the delivery service level: Next Day Delivery (NDD) or Same Day Delivery (SDD).
Load Type Document or Non-Document (selected from dropdown).
Consignment Type Select consignment category (e.g., Forward).
Shipment Synchronization Settings
Auto Sync Settings
Figure: Synchronize Settings (Shipment Sync) in WooCommerce.
⚠ NOTE: Auto Sync is optional. If not enabled, you can still manually push orders to Jeebly through the Book Now section.
⚠ IMPORTANT: Shipments will NOT sync automatically if any of the following conditions are met:
  • Address details are missing (pickup/drop);
  • More than 10 pieces are included;
  • Shipment weight exceeds 20 kg;
  • COD value exceeds AED 5,000.
No notification will be triggered in these cases — verify all order data is complete before enabling auto-sync.
8

Book Now — Manual Shipment Booking

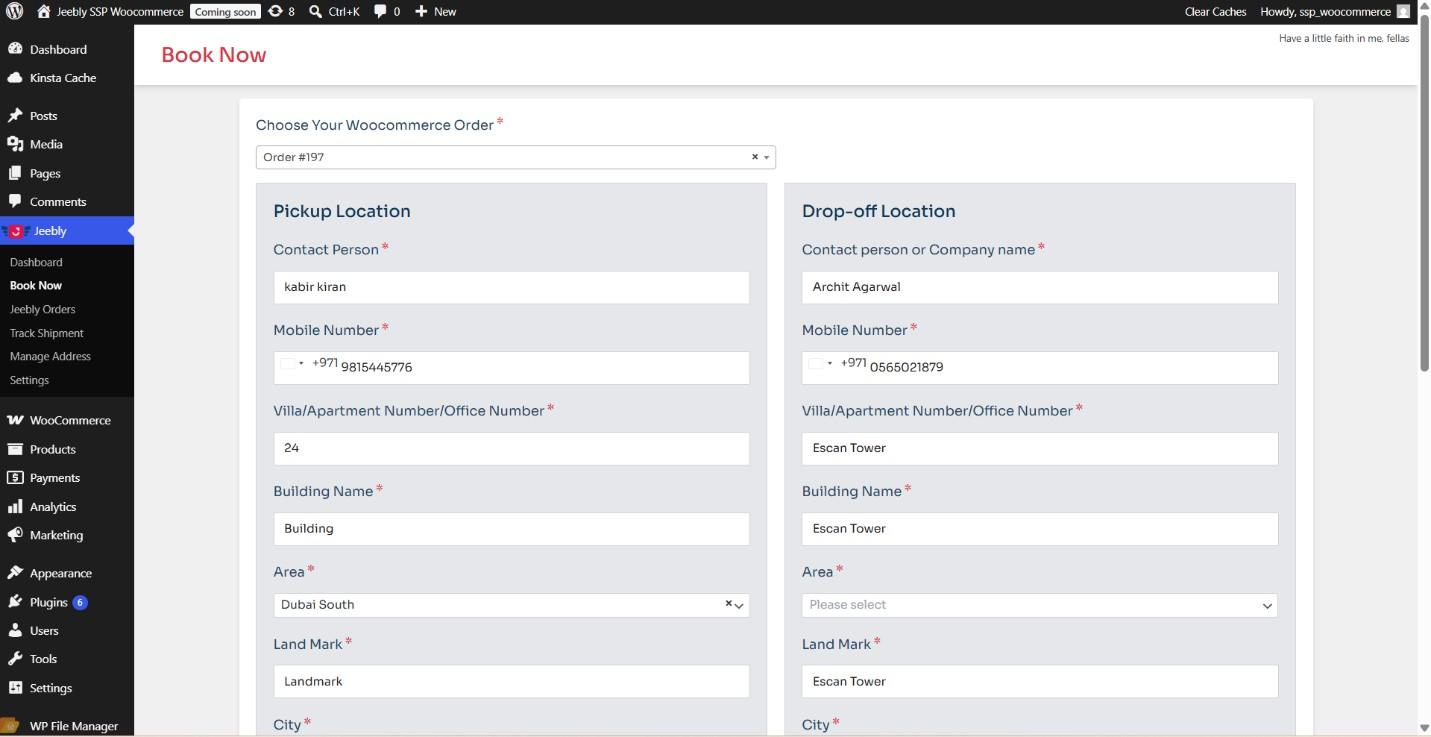
The Book Now feature is used to manually sync and submit individual orders from your WooCommerce store to the Jeebly system.

How to Book a Shipment Manually

  • Use the Choose Your WooCommerce Order dropdown to select an order that has not yet been synced.
  • Complete all mandatory fields in the Pickup Location, Drop-off Location, and Package Details sections.
  • Click Submit to create the shipment in the Jeebly system.

Mandatory Fields

Field Section Notes
Order Number Header Select from WooCommerce orders not yet synced
Service Type Header SDD or NDD
Load / Courier Type Header Document or Non-Document
Consignment Type Header Select consignment category
Contact Person Pickup Name of pickup contact
Mobile Number Pickup Contact phone number
Villa / Building / Area Pickup & Drop All required for both pickup and drop-off
Landmark Pickup & Drop Nearby landmark for both locations
City Pickup & Drop City name for both locations
Pickup Date Package Format: DD/MM/YYYY
Number of Pieces Package Maximum 10 pieces; whole numbers only
Item Weight (kg) Package Maximum 20 kg; whole numbers only
Order Payment Type Package Prepaid or COD
COD Amount Package Required only if payment type is COD; max AED 5,000
Manual Booking Form Interface
Book Now Manual Form
Figure: Manual Booking Form in WooCommerce Admin.

Submission & Validation Rules

Ensure all mandatory details are validated before submitting the order to Jeebly:

Whole Numbers Only: Zero and decimals are not permitted in Pieces or Weight.
Maximum Weight: Total consignment weight must not exceed 20 kg.
Maximum Pieces: Up to 10 packages allowed per consignment.
COD Threshold: Cash on delivery limit capped at AED 5,000.
Once placed, shipment editing is locked.
Place Order Action
Place Order Action
Figure: Submit Shipment Booking Action.
9

Jeebly Orders

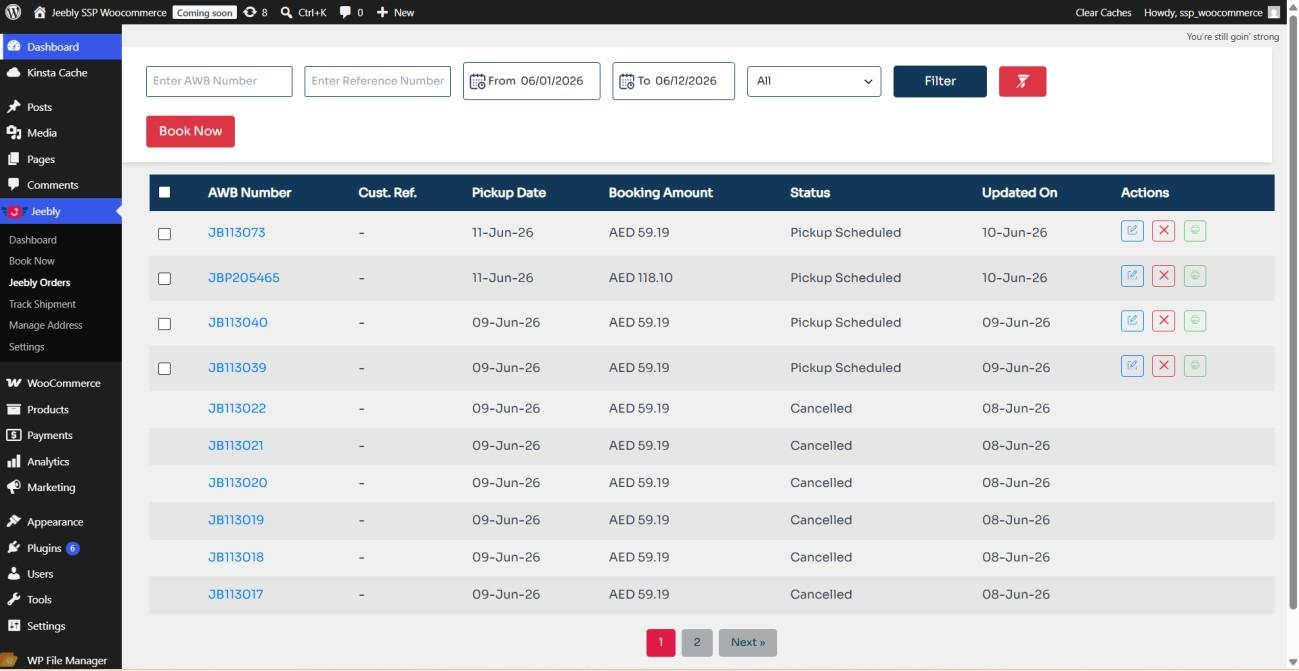
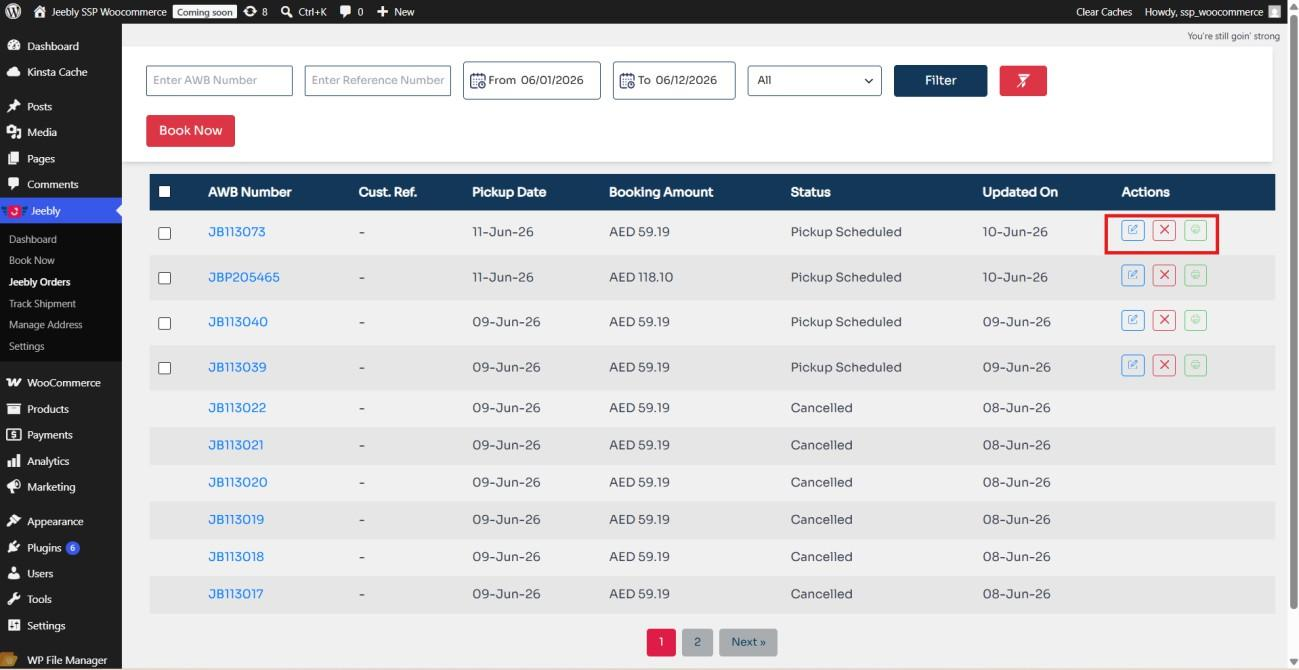
The Jeebly Orders page provides a full list of all shipments synced with the Jeebly system. It includes filtering, wallet management, and actions. Navigate to Jeebly → Jeebly Orders.

Jeebly Orders List
Jeebly Orders Screen
Figure: Jeebly Orders Page and Filters.
Cancel Shipment Action
Cancel Shipment
Figure: Cancel Shipment in Pickup Scheduled state.

Page Elements & Filters

Element Description
Jeebly Account Balance Displays your current Jeebly wallet balance in AED.
Recharge Account Redirects to the Jeebly SSP account page to top up your wallet.
AWB Number filter Filter shipments by entering a specific AWB number.
Reference Number filter Filter by WooCommerce order/reference number.
Status filter Filter by shipment status: All, Pickup Scheduled, In Transit, Delivered, Cancelled, etc.
Date Range filter Filter by pickup date from/to range.
AWB No (clickable link) Clicking the AWB number opens the Jeebly shipment tracking page for real-time status.
AWB Label Print Print the AWB label for a selected shipment.
Cancel (✕) button Cancels the shipment. Only available before status reaches “Pickup Completed”.

Order Table Columns

The order table displays the following columns: AWB Number, Customer Reference (Cust. Ref.), Pickup Date, Booking Amount, Status, Updated On, and Actions.

Cancelling a Shipment

To cancel a shipment:

  • The shipment status must be Pickup Scheduled (not yet collected by courier).
  • Click the ✕ (Cancel) button in the Actions column.
  • Cancellation triggers an automatic refund, reflected on the Jeebly SSP Transaction page.
  • Once the status has progressed beyond Pickup Scheduled, cancellation is not available via the WooCommerce plugin — contact Jeebly support directly.

Shipment Tracking

Click on any AWB number link in the AWB Number column to open the Jeebly shipment tracking page and monitor real-time delivery status.

10

Track Shipment

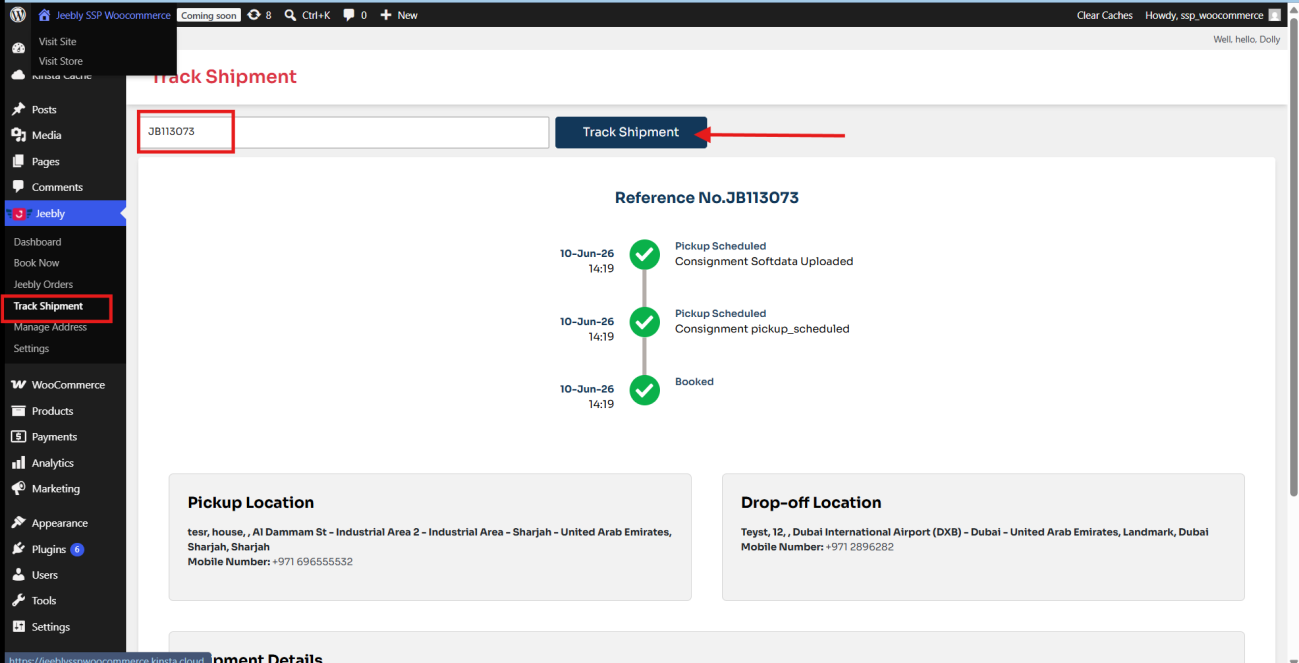
To view the real-time tracking status of any shipment, navigate to Jeebly → Track Shipment:

  • Enter the Jeebly AWB number in the tracking input field.
  • Ensure there are no leading or trailing spaces in the AWB number to avoid errors.
  • Click Track Shipment. The system will fetch and display the full tracking timeline.
Real-Time Tracking View
Track Shipment Timeline
Figure: Live Tracking Timeline and Milestone History.
⚠ NOTE: You can also access the tracking page by clicking on any AWB number link in the Jeebly Orders list.
11

Shipment Creation Rules

All shipments created through the Jeebly WooCommerce Plugin must comply with the following operational rules. Non-compliance will cause sync failures or booking errors.

Service Type Cutoff Times

Service Type Cutoff & Restrictions
Same Day Delivery (SDD) Order must be created before 11:00 AM if pickup date = order creation date. Can be booked for any day except Sundays.
Next Day Delivery (NDD) Order must be created before 4:00 PM if pickup date = order creation date. Can be booked for any day except Sundays.

Shipment Limitations

Limitation Details
Maximum pieces per shipment 10 pieces
Maximum weight per shipment 20 kg
Maximum COD value AED 5,000 (zero and decimal values not permitted in COD field)
Sundays Restricted — no shipments can be booked or picked up on Sundays.
Intercity Same Day Delivery Not available.
Shipment editing Not available once a shipment is created.
COD settlement Requires Bank Account and KYC verification on your Jeebly account.

Definition of Pieces

The total number of shipment pieces includes the quantities of each product line item.

Example: If Product A has 4 units and Product B has 6 units, the total piece count = 10.
12

Change Log

Version Date Changes
v2.0 June 2026 Updated documentation to align with Shopify plugin guide v2.0 structure. Added full Book Now field reference, Manage Address table, Jeebly Orders elements table, improved Shipment Creation Rules layout, Track Shipment section, and dashboard element descriptions.
v1.1 2025 Initial WooCommerce plugin integration document (Woo-Commerce V1.1).

Jeebly — Joy in Motion

Integrate your WordPress WooCommerce store with Jeebly today and leverage seamless last-mile fulfillment across the UAE.

Install Plugin from WordPress.org
On This Page
Need Help?

Have questions regarding your WooCommerce store integration? Our integration engineering team is ready to assist.